Self-hosted ClearML Server behind a firewall

Setting up a ClearML Server on a Linux host behind a firewall


ClearML is kind of an end-to-end MLOps solution.

Nowadays, there are quite a few options regarding ML Experiment Tracking and Management tools like MLFlow, ClearML, W&B, Comet, Neptune, DagsHub, to name but a few. Some of these actually are (or almost are, depending) end-to-end MLOps solutions.

For some insights:

DVC
Ray
Synthesis:
Neptune neptune.ai - 13 Best Tools for ML Experiment Tracking and Management in 2024
ClearML Stacking up against the Competition
DagsHub Best 8 Experiment Tracking Tools for Machine Learning 2023
Less concise:
Neptune MLOps Landscape in 2024: Top Tools and Platforms
Neptune Open Source MLOps: Platforms, Frameworks and Tools
Neptune Machine Learning Model Management: What It Is, Why You Should Care, and How to Implement It
Monitoring Machine Learning Models in Production -- A Comprehensive Guide
Informal discussions:
Neptune MLOps: What It Is, Why It Matters, and How to Implement It
Reddit [D] MLFlow vs ClearML vs Gradient Paperspace
Reddit [D] W&B vs. Neptune vs. ClearML vs. Comet (2023)

For this tutorial, I assume that you already want to install and use ClearML.

Setting & Accessing the ClearML GUI

The ClearML WebUI can be used either hosted by ClearML itself (they have a free tier and some paid plans), or self-hosted (they are open-source after all, except probably for enterprise specific features).

Here, we will focus only on the self-hosted version in a specific settings which make it slightly less straight-forward to set.

Context

Say, you are in the following case:

  • the clearml-server docker compose running on Host workstation ‘Red’ (running Linux - in my case: Xubuntu22.04) behind a firewall
  • a Proxy server ‘Pi’ (for rapsberry pi) (running Linux - in my case: Raspberry Pi OS/Raspbian) outside of the firewall network
flowchart LR
    A[
        Client
        Blue
        <hr><p style="color:blue;">Request: `ssh localhost:9108`
        via `ssh proxy.blissfox.xyz -p 22`</p><hr><p style="color:red;">Request: Red:8080</p>
    ]
    B[
        Proxy
        Pi
        <hr>< PROXY_IP >
    ]
    C[[
        <i class="fa-solid fa-shield"></i> Firewall#8201;
    ]]
    D["
        Workstation
        Red
    "]
    E[["
        Reverse tunneling
        <hr>9108:9108
    "]]
    F[["
        OVH
        <hr>`proxy.blissfox.xyz`-->< ROUTER_IP >
    "]]
    H[["
        <i class="fa-solid fa-shield"></i> UFW#8201;
        <hr>22
    "]]
    I["
        <i class="fa-solid fa-house-signal"></i><i class="fa-solid fa-shield"></i> Router#8201;#8201;#8201;
        <hr>< ROUTER_IP >:22-->< PROXY_IP >:22
    "]
    J[["
        <i class="fa-brands fa-docker"></i>
        8080 (app)
        8008 (api)
        8081 (files)
    "]]
    
    B x-.-x C --- D --> E
    D --> J
    A x-.-x C
    B --- E
    A --> F --> I --> H --> B
    A o-.->|???| J

    linkStyle 2 stroke:blue
    linkStyle 3 stroke:red
    linkStyle 5 stroke:blue
    linkStyle 6 stroke:blue
    linkStyle 7 stroke:blue
    linkStyle 8 stroke:blue
    linkStyle 9 stroke:blue
    linkStyle 10 stroke:red


    subgraph "<i class="fa-solid fa-server"></i> Proxy#8201;#8201;#8201;"
        B
        E
        H
        I
    end
    subgraph "<i class="fa-solid fa-server"></i> Host#8201;#8201;#8201;"
        C
        D
        J
    end
    subgraph "<i class="fa-solid fa-laptop"></i> Client <i class="fa-solid fa-desktop"></i>#8201;#8201;#8201;"
        A
    end
    subgraph "<i class="fa-solid fa-cloud"></i> OVH#8201;#8201;#8201;"
        F
    end


We already have a reverse tunnel set to bypass the firewall on the server that forward a port 9108 to the proxy (see Reverse-tunneling to bypass a firewall with no fixed IP adress), so that the client can connect in ssh to the server via the proxy (in blue) (we named the alias from a client to workstation via the proxy server workstation_sshR).
Say that we run services on the server in docker containers showing on ports 8080, 8008, 8081, and want to access said services from the client (in red).

We will see two ways to access the WebUI and services:

  • through SSH
  • through a (sub)domain name/URL

Through SSH

In the case where you have already:

You can then access the WebUI by doing the following:

  1. Launch clearml-server docker on the Worstation Red
    See Step0 (1/2) – Launch the ClearML-server Docker Compose

  2. Forward port to connect computer:
     ssh -L 8080:localhost:8080 blissfox_lab_sshR
    

    (access an http server as localhost from an external pc over ssh)

    Likewise, you can forward the other ports (8081, 8008):

     ssh -L 8081:localhost:8081 workstation_sshR
     ssh -L 8008:localhost:8008 workstation_sshR
    

    SSH alias workstation_sshR is defined in Reverse-tunneling to bypass a firewall with no fixed IP adress.

  3. In the browser: http://localhost:8080

Thus, you can probably (I did not run the tests for the api and fileserver access for the SSH access, but I see no reason why it would not work) use only ssh tunnels to access the clearml-server if you wish so.

A more generic approach is to use URLs with subdomains, that is the following subsection.

On the Web

Preliminary

How would we go about to access the clearml-server services through (sub)domain name(s)/URL(s)?

The main question compared to what we previously did with reverse tunneling, would be:
Can we somehow configure a redirection from a URL to an IP address with a specific port specified?

After some searches:

From Configuration dns sous domaine OVH
Original content (in French) ''Hello ! Les serveurs DNS ne font que la résolution noms de domaines à adresse IP. Ils ne gèrent ni le port (dans ton cas le 8080) ni les dossiers (dans ton cas `/site1`).\ Après il est possible que tu gère ca via ton rooter ou directement depuis ton NAS, dans ce cas ton domaine pointe vers ton ip (donc arrive sur ton rooter), le rooter redirige vers le NAS avec le bon port et apres le NAS cherche a faire correspondre le domaine avec le dossier.''

DNS servers only resolves IP address from domain names. They deal neihter with the port (e.g. 8080) nor with the files (e.g. /site1). It is possible to deal with it via the router or directly from a NAS, in which case, your domain points to the IP (thus it arrives on the router), the router redirects it to the NAS with the right port, afterwards, the NAS will try to match the domain to a directory.


From Multiple subdomains alongside DDNS – Ramipro’s answer:

'’A CNAME record does not modify the host of the request. A record A.example.net CNAME B.example.net simply says that the ip of A should be resolved as if it was B. The request will still be directed to A if you try to access A.example.net.\ Then, in your reverse proxy, you create virtual hosts for both A and B, and route them to wherever you need, be it a specific directory or another host/port.\ In any case, depending on with whom you’ve registered your mydomain.com, they might allow free DDNS, so it would be worth checking.\ Regardless, in your case, I would set up a CNAME from something like ip1.mydomain.com to the ddns domain, and then your specific services can be CNAMEd to this ip1, like nextcloud.mydomain.com -> ip1.mydomain.com’’

Considering the preceding two notes, we should:

  • set reverse tunnels for each service port
  • set a (sub)domain name for each service
  • direct these (sub)domains to the router of the proxy server
  • set the router so that it bounces http/https requests to the proxy server Pi
  • set a reverse proxy on the Pi so that it has a virtual host config for each pair of (sub)domain request and service ports

More on reverse proxy in NGINX (Step 2).

Implementation

Thus, this is what we end up with:

flowchart LR
    A[
        Client
        Blue
    ]
    B[
        Proxy
        Pi
    ]
    C[[
        <i class="fa-solid fa-shield"></i> Firewall#8201;
    ]]
    D["
        Workstation
        Red
    "]
    J[["
        <i class="fa-brands fa-docker"></i>
        8080 (app)
        8008 (api)
        8081 (files)
    "]]
    E[["
        Reverse tunneling
        <hr>8080:8080
        8008:8008
        8081:8081
    "]]
    F[["
        OVH
    "]]
    G[["
        NGINX
    "]]
    H[["
        <i class="fa-solid fa-shield"></i> UFW#8201;
    "]]
    I["
        <i class="fa-solid fa-house-signal"></i><i class="fa-solid fa-shield"></i> Router#8201;#8201;#8201;
    "]
    
    B x-.-x C --- D ---|<div class="numberCircle">0</div><div class="numberCircle">7</div><div class="numberCircle">8</div><div class="numberCircle">9</div>| J
    A x-.-x C
    J --->|<div class="numberCircle">1</div>| E
    B ---|<div class="numberCircle">1</div>| E
    A -->|<div class="numberCircle">5</div>| F -->|<div class="numberCircle">4</div><div class="numberCircle">5</div>| I -->|<div class="numberCircle">3</div><div class="numberCircle">4</div><div class="numberCircle">6</div>| H -->|<div class="numberCircle">2</div><div class="numberCircle">3</div><div class="numberCircle">6</div>| G -->|<div class="numberCircle">2</div><div class="numberCircle">6</div>| B


    subgraph "<i class="fa-solid fa-server"></i> Proxy#8201;#8201;#8201;"
        B
        E
        G
        H
        I
    end
    subgraph "<i class="fa-solid fa-server"></i> Host#8201;#8201;#8201;"
        C
        D
        J
    end
    subgraph "<i class="fa-solid fa-laptop"></i> Client <i class="fa-solid fa-desktop"></i>#8201;#8201;#8201;#8201;#8201;"
        A
    end
    subgraph "<i class="fa-solid fa-cloud"></i> OVH#8201;#8201;#8201;"
        F
    end


With the following corresponding steps:

Step Desc.
0
1
Forward the ports to the proxy server
2
Set a Reverse Proxy
3
Open port in firewall
4
Direct the port flow to the Reverse Proxy server
5
Direct URLs to the Proxy server
6
HTTPS
7
Web Login Authentication using hashed passwords
8
Server Credentials and Secrets
9
Securing ClearML Server -- File Server Security

After the steps, we have:

flowchart LR
    A[
        Client
        Blue
    ]
    B[
        Proxy
        Pi
    ]
    C[[
        <i class="fa-solid fa-shield"></i> Firewall#8201;
    ]]
    D["
        Workstation
        Red
    "]
    J[["
        <i class="fa-brands fa-docker"></i>
        clearml_server
        <hr>8080 (app)
        8008 (api)
        8081 (files)
        <hr>Web auth. login
        username/hashed password
        <hr>Credentials & secrets
    "]]
    K[["
        systemd
        <hr>clearml_app-tunnel.service
        clearml_api-tunnel.service
        clearml_files-tunnel.service
    "]]
    E[["
        Reverse tunneling
        <hr>8080:8080
        8008:8008
        8081:8081
    "]]
    F[["
        OVH
        <hr>(`Dynhost`)
        <hr>`proxy.blissfox.xyz`-->< ROUTER_IP >
        <hr>`CNAME`
        <hr>`app_clearml.blissfox.xyz` -> `proxy.blissfox.xyz`
        `api_clearml.blissfox.xyz` -> `proxy.blissfox.xyz`
        `files_clearml.blissfox.xyz` -> `proxy.blissfox.xyz`
    "]]
    G[["
        NGINX
        <hr>Listen to ports 80 (http) & 443 (https)
        <hr>`app_clearml.blissfox.xyz` -> `http://localhost:8080`
        `api_clearml.blissfox.xyz` -> `http://localhost:8008`
        `files_clearml.blissfox.xyz` -> `http://localhost:8081`
    "]]
    H[["
        <i class="fa-solid fa-shield"></i> UFW#8201;
        <hr>Allowed:
        <hr>22
        80/tcp (http)
        443/tcp (https)
    "]]
    I["
        <i class="fa-solid fa-house-signal"></i><i class="fa-solid fa-shield"></i> Router#8201;#8201;#8201;
        <hr>< ROUTER_IP >:22-->< PROXY_IP >:22
        80 -> < PROXY_IP >:80
        443 -> < PROXY_IP >:443
    "]
    
    B x-.-x C --- D ---|<div class="numberCircle">0</div><div class="numberCircle">7</div><div class="numberCircle">8</div><div class="numberCircle">9</div>| J
    A x-.-x C
    J --->|<div class="numberCircle">1</div>| K --->|<div class="numberCircle">1</div>| E
    B ---|<div class="numberCircle">1</div>| E
    A -->|<div class="numberCircle">5</div>| F -->|<div class="numberCircle">4</div><div class="numberCircle">5</div>| I -->|<div class="numberCircle">3</div><div class="numberCircle">4</div><div class="numberCircle">6</div>| H -->|<div class="numberCircle">2</div><div class="numberCircle">3</div><div class="numberCircle">6</div>| G -->|<div class="numberCircle">2</div><div class="numberCircle">6</div>| B


    subgraph "<i class="fa-solid fa-server"></i> Proxy#8201;#8201;#8201;"
        B
        E
        G
        H
        I
    end
    subgraph "<i class="fa-solid fa-server"></i> Host#8201;#8201;#8201;"
        C
        D
        J
        K
    end
    subgraph "<i class="fa-solid fa-laptop"></i> Client <i class="fa-solid fa-desktop"></i>#8201;#8201;#8201;#8201;#8201;"
        A
    end
    subgraph "<i class="fa-solid fa-cloud"></i> OVH#8201;#8201;#8201;"
        F
    end


Docker Compose & ClearML-server config (Step 0)

Docker Compose (Step 0 - 1/2)

0
  • Launch the ClearML-server Docker Compose
[Back to Steps]

Getting a bit familiar with Docker Compose will help, have a look at docker compose

To deploy the ClearML server:

  • Follow the Install guide:
    From ClearML – Linux and macOS

    ’’

    Linux and macOS

    Deploy the ClearML Server in Linux or macOS using the pre-built Docker image.

    For ClearML docker images, including previous versions, see https://hub.docker.com/r/allegroai/clearml. However, pulling the ClearML Docker image directly is not required. ClearML provides a docker-compose YAML file that does this. The docker-compose file is included in the instructions on this page.

    For information about upgrading ClearML Server in Linux or macOS, see here.

    INFO

    If ClearML Server is being reinstalled, clearing browser cookies for ClearML Server is recommended. For example, for Firefox, go to Developer Tools > Storage > Cookies, and for Chrome, go to Developer Tools > Application > Cookies, and delete all cookies under the ClearML Server URL.

    Prerequisites

    For Linux users only:

    • Linux distribution must support Docker. For more information, see the Docker documentation.
    • Be logged in as a user with sudo privileges.
    • Use bash for all command-line instructions in this installation.
    • The ports 8080, 8081, and 8008 must be available for the ClearML Server services.

    Deploying

    CAUTION

    By default, ClearML Server launches with unrestricted access. To restrict ClearML Server access, follow the instructions in the Security page.

    MEMORY REQUIREMENT

    Deploying the server requires a minimum of 4 GB of memory, 8 GB is recommended.

    To launch ClearML Server on Linux or macOS:

    1. Install Docker. The instructions depend upon the operating system:
    2. the Docker CE installation. Execute the command:
       docker run hello-world
      

      The expected is output is:

       Hello from Docker!
       This message shows that your installation appears to be working correctly.
       To generate this message, Docker took the following steps:
        
       1. The Docker client contacted the Docker daemon.
       2. The Docker daemon pulled the "hello-world" image from the Docker Hub. (amd64)
       3. The Docker daemon created a new container from that image which runs the executable that produces the output you are currently reading.
       4. The Docker daemon streamed that output to the Docker client, which sent it to your terminal.
      
    3. For macOS only, increase the memory allocation in Docker Desktop to 8GB.
      • i. In the top status bar, click the Docker icon.
      • ii. Click Preferences > Resources > Advanced, and then set the memory to at least 8192.
      • iii. Click Apply.
    4. For Linux only, install docker-compose. Execute the following commands (for more information, see Install Docker Compose in the Docker documentation):
       sudo curl -L "https://github.com/docker/compose/releases/download/1.24.1/docker-compose-$(uname -s)-$(uname -m)" -o /usr/local/bin/docker-compose
       sudo chmod +x /usr/local/bin/docker-compose
      
    5. Increase vm.max_map_count for Elasticsearch in Docker. Execute the following commands, depending upon the operating system:
      • Linux:
         echo "vm.max_map_count=262144" > /tmp/99-clearml.conf
         sudo mv /tmp/99-clearml.conf /etc/sysctl.d/99-clearml.conf
         sudo sysctl -w vm.max_map_count=262144
         sudo service docker restart
        
      • macOS:
         screen ~/Library/Containers/com.docker.docker/Data/vms/0/tty
         sysctl -w vm.max_map_count=262144
        
    6. Remove any previous installation of ClearML Server.

      This clears all existing ClearML SDK databases.

       sudo rm -R /opt/clearml/
      
    7. Create local directories for the databases and storage.
       sudo mkdir -p /opt/clearml/data/elastic_7
       sudo mkdir -p /opt/clearml/data/mongo_4/db
       sudo mkdir -p /opt/clearml/data/mongo_4/configdb
       sudo mkdir -p /opt/clearml/data/redis
       sudo mkdir -p /opt/clearml/logs
       sudo mkdir -p /opt/clearml/config
       sudo mkdir -p /opt/clearml/data/fileserver
      
    8. For macOS only do the following:
      • i. Open the Docker app.
      • ii. Select Preferences.
      • iii. On the File Sharing tab, add /opt/clearml.
    9. Grant access to the Dockers, depending upon the operating system.
      • Linux:
         sudo chown -R 1000:1000 /opt/clearml
        
      • macOS:
         sudo chown -R $(whoami):staff /opt/clearml
        
    10. Download the ClearML Server docker-compose YAML file.
      sudo curl https://raw.githubusercontent.com/allegroai/clearml-server/master/docker/docker-compose.yml -o /opt/clearml/docker-compose.yml
      
    11. For Linux only, configure the ClearML Agent Services. If CLEARML_HOST_IP is not provided, then ClearML Agent Services uses the external public address of the ClearML Server. If CLEARML_AGENT_GIT_USER / CLEARML_AGENT_GIT_PASS are not provided, then ClearML Agent Services can’t access any private repositories for running service tasks.
      export CLEARML_HOST_IP=server_host_ip_here
      export CLEARML_AGENT_GIT_USER=git_username_here
      export CLEARML_AGENT_GIT_PASS=git_password_here
      
    12. Run docker-compose with the downloaded configuration file.
      docker-compose -f /opt/clearml/docker-compose.yml up -d
      

    The server is now running on http://localhost:8080.

    Port Mapping

    After deploying ClearML Server, the services expose the following ports:

    • Web server on port 8080
    • API server on port 8008
    • File server on port 8081

    Restarting

    To restart ClearML Server Docker deployment:

    • Stop and then restart the Docker containers by executing the following commands:
        docker-compose -f /opt/clearml/docker-compose.yml down
        docker-compose -f /opt/clearml/docker-compose.yml up -d
      

    […]

    ’’

    curl: Client URL, ‘‘designed to transfer data using various protocols such as HTTP, HTTPS, FTP, SCP, SFTP, and more’‘[1]

    • -o/--output <file>: ‘‘Write output to instead of stdout.''[2]
    • -L/--location: ‘‘(HTTP/HTTPS) If the server reports that the requested page has moved to a different location (indicated with a Location: header and a 3XX response code), this option will make curl redo the request on the new place. If used together with -i/--include or -I/--head, headers from all requested pages will be shown. When authentication is used, curl only sends its credentials to the initial host. If a redirect takes curl to a different host, it won’t be able to intercept the user+password. See also --location-trusted on how to change this. You can limit the amount of redirects to follow by using the --max-redirs option.

      When curl follows a redirect and the request is not a plain GET (for example POST or PUT), it will do the following request with a GET if the HTTP response was 301, 302, or 303. If the response code was any other 3xx code, curl will re-send the following request using the same unmodified method.’‘[2]

    For an example of --location, one can look at [3].

    sudo curl -L "https://github.com/docker/compose/releases/download/1.24.1/docker-compose-$(uname -s)-$(uname -m)" -o /usr/local/bin/docker-compose
    

    If there is a redirection from the initial url to another, the request is resubmitted to the new url, thanks to -L/--location. The traget file here is saved at -o <DESTINATION> instead of stdout.

    See [1] curl Command in Linux with Examples, [2] curl(1) - Linux man page, [3] convert a curl cmdline to libcurl source code for references.

  • The Docker Compose file I used is the original from GH allegroai/docker/docker-compose.yml but with a slight modification:
    name: clearml-server
    # version: "3.6"
    

    version is deprecated

    From Docker Docs – Version top-level element (optional)

    ’’ Version top-level element (optional)

    The top-level version property is defined by the Compose Specification for backward compatibility. It is only informative.

    Compose doesn’t use version to select an exact schema to validate the Compose file, but prefers the most recent schema when it’s implemented.

    Compose validates whether it can fully parse the Compose file. If some fields are unknown, typically because the Compose file was written with fields defined by a newer version of the Specification, you’ll receive a warning message. ‘’

# Launch the services
docker-compose -f /opt/clearml/docker-compose.yml up -d
# Stop the services
docker-compose -f /opt/clearml/docker-compose.yml down

-d: detached mode

docker-compose an older version of docker compose, see Docker Docs – docker-compose vs docker compose.

The new version is docker compose.

A more up-to-date version is:

# Launch the services
docker compose -f /opt/clearml/docker-compose.yml up -d
# Stop the services
docker compose -f /opt/clearml/docker-compose.yml down

Adding a name in the compose.yml is similar to using (with only a difference in precedence, see Docker Docs – Use -p to specify a project name):

docker compose -p clearml-server -f /opt/clearml/docker-compose.yml up -d

This, in turn, allows you to shutdown the compose using the project name instead of giving back all the file path:

docker compose -p clearml-server down

Launching the compose, we get:

docker-compose -f /opt/clearml/docker-compose.yml up -d
Output
WARNING: The ELASTIC_PASSWORD variable is not set. Defaulting to a blank string.
WARNING: The CLEARML_HOST_IP variable is not set. Defaulting to a blank string.
WARNING: The CLEARML_AGENT_GIT_USER variable is not set. Defaulting to a blank string.
WARNING: The CLEARML_AGENT_GIT_PASS variable is not set. Defaulting to a blank string.
WARNING: Some services (agent-services) use the 'deploy' key, which will be ignored. Compose does not support 'deploy' configuration - use `docker stack deploy` to deploy to a swarm.
Creating network "clearml_backend" with driver "bridge"
Creating network "clearml_frontend" with driver "bridge"
Creating clearml-fileserver ... done
Creating clearml-elastic    ... done
Creating clearml-redis      ... done
Creating clearml-mongo      ... done
Creating clearml-apiserver  ... done
Creating async_delete           ... done
Creating clearml-webserver      ... done
Creating clearml-agent-services ... done

You can check the logs for each service using:

docker logs [SERVICE]

For reference, see How to view log output using docker-compose run? or Docker Docs – docker compose logs.
For instance:

docker logs clearml-apiserver
Output
[2024-01-03 08:02:15,444] [9] [INFO] [clearml.redis_manager] Using override redis host redis
[2024-01-03 08:02:15,444] [9] [INFO] [clearml.redis_manager] Using override redis port 6379
[2024-01-03 08:02:15,459] [9] [INFO] [clearml.es_factory] Using override elastic host elasticsearch
[2024-01-03 08:02:15,459] [9] [INFO] [clearml.es_factory] Using override elastic port 9200
[2024-01-03 08:02:15,592] [9] [WARNING] [clearml.schema_reader] failed loading cache: [Errno 2] No such file or directory: '/opt/clearml/apiserver/schema/services/_cache.json'
[2024-01-03 08:02:15,593] [9] [INFO] [clearml.schema_reader] regenerating schema cache
[2024-01-03 08:02:20,654] [9] [INFO] [clearml.app_sequence] ################ API Server initializing #####################
[2024-01-03 08:02:20,654] [9] [INFO] [clearml.database] Initializing database connections
[2024-01-03 08:02:20,654] [9] [INFO] [clearml.database] Using override mongodb host mongo
[2024-01-03 08:02:20,654] [9] [INFO] [clearml.database] Using override mongodb port 27017
[2024-01-03 08:02:20,656] [9] [INFO] [clearml.database] Registering connection to auth-db (mongodb://mongo:27017/auth)
[2024-01-03 08:02:20,657] [9] [INFO] [clearml.database] Registering connection to backend-db (mongodb://mongo:27017/backend)
[2024-01-03 08:02:20,658] [9] [WARNING] [clearml.initialize] Could not connect to ElasticSearch Service. Retry 1 of 4. Waiting for 30sec
[2024-01-03 08:02:50,737] [9] [INFO] [clearml.initialize] Applying mappings to ES host: [ConfigTree([('host', 'elasticsearch'), ('port', '9200')])]
/usr/local/lib/python3.9/site-packages/elasticsearch/connection/base.py:200: ElasticsearchWarning: Legacy index templates are deprecated in favor of composable templates.
  warnings.warn(message, category=ElasticsearchWarning)
[2024-01-03 08:02:50,777] [9] [INFO] [clearml.initialize] [{'mapping': 'events_plot', 'result': {'acknowledged': True}}, {'mapping': 'events_training_debug_image', 'result': {'acknowledged': True}}, {'mapping': 'events', 'result': {'acknowledged': True}}, {'mapping': 'events_log', 'result': {'acknowledged': True}}]
[2024-01-03 08:02:50,778] [9] [INFO] [clearml.initialize] Applying mappings to ES host: [ConfigTree([('host', 'elasticsearch'), ('port', '9200')])]
[2024-01-03 08:02:50,797] [9] [INFO] [clearml.initialize] [{'mapping': 'queue_metrics', 'result': {'acknowledged': True}}, {'mapping': 'worker_stats', 'result': {'acknowledged': True}}]
[2024-01-03 08:02:50,797] [9] [INFO] [clearml.apiserver.mongo.initialize.migration] Started mongodb migrations
[2024-01-03 08:02:50,805] [9] [INFO] [clearml.apiserver.mongo.initialize.migration] Finished mongodb migrations
[2024-01-03 08:02:50,818] [9] [INFO] [clearml.service_repo] Loading services from /opt/clearml/apiserver/services
[2024-01-03 08:02:50,936] [9] [INFO] [clearml.app_sequence] Exposed Services: auth.create_credentials auth.create_user auth.edit_credentials auth.edit_user auth.fixed_users_mode auth.get_credentials auth.get_token_for_user auth.login auth.logout auth.revoke_credentials auth.validate_token debug.ping events.add events.add_batch events.clear_scroll events.clear_task_log events.debug_images events.delete_for_model events.delete_for_task events.download_task_log events.get_debug_image_sample events.get_multi_task_plots events.get_plot_sample events.get_scalar_metric_data events.get_scalar_metrics_and_variants events.get_task_events events.get_task_latest_scalar_values events.get_task_log events.get_task_metrics events.get_task_plots events.get_task_single_value_metrics events.get_vector_metrics_and_variants events.multi_task_scalar_metrics_iter_histogram events.next_debug_image_sample events.next_plot_sample events.plots events.scalar_metrics_iter_histogram events.scalar_metrics_iter_raw events.vector_metrics_iter_histogram login.logout login.supported_modes models.add_or_update_metadata models.archive_many models.create models.delete models.delete_many models.delete_metadata models.edit models.get_all models.get_all_ex models.get_by_id models.get_by_id_ex models.get_by_task_id models.get_frameworks models.make_private models.make_public models.move models.publish_many models.set_ready models.unarchive_many models.update models.update_for_task models.update_tags organization.download_for_get_all organization.get_entities_count organization.get_tags organization.get_user_companies organization.prepare_download_for_get_all pipelines.delete_runs pipelines.start_pipeline projects.create projects.delete projects.get_all projects.get_all_ex projects.get_by_id projects.get_hyper_parameters projects.get_hyperparam_values projects.get_model_metadata_keys projects.get_model_metadata_values projects.get_model_tags projects.get_project_tags projects.get_task_parents projects.get_task_tags projects.get_unique_metric_variants projects.get_user_names projects.make_private projects.make_public projects.merge projects.move projects.update projects.validate_delete queues.add_or_update_metadata queues.add_task queues.create queues.delete queues.delete_metadata queues.get_all queues.get_all_ex queues.get_by_id queues.get_default queues.get_next_task queues.get_num_entries queues.get_queue_metrics queues.move_task_backward queues.move_task_forward queues.move_task_to_back queues.move_task_to_front queues.peek_task queues.remove_task queues.update reports.archive reports.create reports.delete reports.get_all_ex reports.get_tags reports.get_task_data reports.move reports.publish reports.unarchive reports.update server.config server.endpoints server.get_stats server.info server.report_stats_option tasks.add_or_update_artifacts tasks.add_or_update_model tasks.archive tasks.archive_many tasks.clone tasks.close tasks.completed tasks.create tasks.delete tasks.delete_artifacts tasks.delete_configuration tasks.delete_hyper_params tasks.delete_many tasks.delete_models tasks.dequeue tasks.dequeue_many tasks.edit tasks.edit_configuration tasks.edit_hyper_params tasks.enqueue tasks.enqueue_many tasks.failed tasks.get_all tasks.get_all_ex tasks.get_by_id tasks.get_by_id_ex tasks.get_configuration_names tasks.get_configurations tasks.get_hyper_params tasks.get_types tasks.make_private tasks.make_public tasks.move tasks.ping tasks.publish tasks.publish_many tasks.reset tasks.reset_many tasks.set_requirements tasks.started tasks.stop tasks.stop_many tasks.stopped tasks.unarchive_many tasks.update tasks.update_batch tasks.update_tags tasks.validate users.create users.delete users.get_all users.get_all_ex users.get_by_id users.get_current_user users.get_preferences users.set_preferences users.update workers.get_activity_report workers.get_all workers.get_count workers.get_metric_keys workers.get_stats workers.register workers.status_report workers.unregister
Loading config from /opt/clearml/apiserver/config/default
Loading config from file /opt/clearml/apiserver/config/default/logging.conf
Loading config from file /opt/clearml/apiserver/config/default/hosts.conf
Loading config from file /opt/clearml/apiserver/config/default/secure.conf
Loading config from file /opt/clearml/apiserver/config/default/apiserver.conf
Loading config from file /opt/clearml/apiserver/config/default/services/organization.conf
Loading config from file /opt/clearml/apiserver/config/default/services/models.conf
Loading config from file /opt/clearml/apiserver/config/default/services/_mongo.conf
Loading config from file /opt/clearml/apiserver/config/default/services/storage_credentials.conf
Loading config from file /opt/clearml/apiserver/config/default/services/tasks.conf
Loading config from file /opt/clearml/apiserver/config/default/services/auth.conf
Loading config from file /opt/clearml/apiserver/config/default/services/queues.conf
Loading config from file /opt/clearml/apiserver/config/default/services/events.conf
Loading config from file /opt/clearml/apiserver/config/default/services/projects.conf
Loading config from file /opt/clearml/apiserver/config/default/services/async_urls_delete.conf
Loading config from /opt/clearml/config
 * Serving Flask app 'server'
 * Debug mode: off
[2024-01-03 08:02:54,424] [9] [INFO] [clearml.service_repo] Returned 200 for debug.ping in 0ms
[2024-01-03 08:17:51,038] [9] [INFO] [clearml.non_responsive_tasks_watchdog] Starting cleanup cycle for running tasks last updated before 2024-01-03 06:17:51.038022
[2024-01-03 08:17:51,073] [9] [INFO] [clearml.non_responsive_tasks_watchdog] 0 non-responsive tasks found
[2024-01-03 08:17:51,073] [9] [INFO] [clearml.non_responsive_tasks_watchdog] 0 non-responsive tasks stopped
[2024-01-03 08:32:51,169] [9] [INFO] [clearml.non_responsive_tasks_watchdog] Starting cleanup cycle for running tasks last updated before 2024-01-03 06:32:51.169801
[2024-01-03 08:32:51,173] [9] [INFO] [clearml.non_responsive_tasks_watchdog] 0 non-responsive tasks found
[2024-01-03 08:32:51,174] [9] [INFO] [clearml.non_responsive_tasks_watchdog] 0 non-responsive tasks stopped
[2024-01-03 08:44:45,808] [9] [INFO] [clearml.redis_manager] Using override redis host redis
[2024-01-03 08:44:45,808] [9] [INFO] [clearml.redis_manager] Using override redis port 6379
[2024-01-03 08:44:45,823] [9] [INFO] [clearml.es_factory] Using override elastic host elasticsearch
[2024-01-03 08:44:45,823] [9] [INFO] [clearml.es_factory] Using override elastic port 9200
[2024-01-03 08:44:45,889] [9] [INFO] [clearml.schema_reader] loading schema from cache
[2024-01-03 08:44:46,038] [9] [INFO] [clearml.app_sequence] ################ API Server initializing #####################
[2024-01-03 08:44:46,039] [9] [INFO] [clearml.database] Initializing database connections
[2024-01-03 08:44:46,039] [9] [INFO] [clearml.database] Using override mongodb host mongo
[2024-01-03 08:44:46,039] [9] [INFO] [clearml.database] Using override mongodb port 27017
[2024-01-03 08:44:46,040] [9] [INFO] [clearml.database] Registering connection to auth-db (mongodb://mongo:27017/auth)
[2024-01-03 08:44:46,042] [9] [INFO] [clearml.database] Registering connection to backend-db (mongodb://mongo:27017/backend)
[2024-01-03 08:44:46,044] [9] [WARNING] [clearml.initialize] Could not connect to ElasticSearch Service. Retry 1 of 4. Waiting for 30sec
[2024-01-03 08:45:16,130] [9] [INFO] [clearml.initialize] Applying mappings to ES host: [ConfigTree([('host', 'elasticsearch'), ('port', '9200')])]
/usr/local/lib/python3.9/site-packages/elasticsearch/connection/base.py:200: ElasticsearchWarning: Legacy index templates are deprecated in favor of composable templates.
  warnings.warn(message, category=ElasticsearchWarning)
[2024-01-03 08:45:16,163] [9] [INFO] [clearml.initialize] [{'mapping': 'events_plot', 'result': {'acknowledged': True}}, {'mapping': 'events_training_debug_image', 'result': {'acknowledged': True}}, {'mapping': 'events', 'result': {'acknowledged': True}}, {'mapping': 'events_log', 'result': {'acknowledged': True}}]
[2024-01-03 08:45:16,163] [9] [INFO] [clearml.initialize] Applying mappings to ES host: [ConfigTree([('host', 'elasticsearch'), ('port', '9200')])]
[2024-01-03 08:45:16,182] [9] [INFO] [clearml.initialize] [{'mapping': 'queue_metrics', 'result': {'acknowledged': True}}, {'mapping': 'worker_stats', 'result': {'acknowledged': True}}]
[2024-01-03 08:45:16,182] [9] [INFO] [clearml.apiserver.mongo.initialize.migration] Started mongodb migrations
[2024-01-03 08:45:16,190] [9] [INFO] [clearml.apiserver.mongo.initialize.migration] Finished mongodb migrations
[2024-01-03 08:45:16,203] [9] [INFO] [clearml.service_repo] Loading services from /opt/clearml/apiserver/services
[2024-01-03 08:45:16,243] [9] [INFO] [clearml.app_sequence] Exposed Services: auth.create_credentials auth.create_user auth.edit_credentials auth.edit_user auth.fixed_users_mode auth.get_credentials auth.get_token_for_user auth.login auth.logout auth.revoke_credentials auth.validate_token debug.ping events.add events.add_batch events.clear_scroll events.clear_task_log events.debug_images events.delete_for_model events.delete_for_task events.download_task_log events.get_debug_image_sample events.get_multi_task_plots events.get_plot_sample events.get_scalar_metric_data events.get_scalar_metrics_and_variants events.get_task_events events.get_task_latest_scalar_values events.get_task_log events.get_task_metrics events.get_task_plots events.get_task_single_value_metrics events.get_vector_metrics_and_variants events.multi_task_scalar_metrics_iter_histogram events.next_debug_image_sample events.next_plot_sample events.plots events.scalar_metrics_iter_histogram events.scalar_metrics_iter_raw events.vector_metrics_iter_histogram login.logout login.supported_modes models.add_or_update_metadata models.archive_many models.create models.delete models.delete_many models.delete_metadata models.edit models.get_all models.get_all_ex models.get_by_id models.get_by_id_ex models.get_by_task_id models.get_frameworks models.make_private models.make_public models.move models.publish_many models.set_ready models.unarchive_many models.update models.update_for_task models.update_tags organization.download_for_get_all organization.get_entities_count organization.get_tags organization.get_user_companies organization.prepare_download_for_get_all pipelines.delete_runs pipelines.start_pipeline projects.create projects.delete projects.get_all projects.get_all_ex projects.get_by_id projects.get_hyper_parameters projects.get_hyperparam_values projects.get_model_metadata_keys projects.get_model_metadata_values projects.get_model_tags projects.get_project_tags projects.get_task_parents projects.get_task_tags projects.get_unique_metric_variants projects.get_user_names projects.make_private projects.make_public projects.merge projects.move projects.update projects.validate_delete queues.add_or_update_metadata queues.add_task queues.create queues.delete queues.delete_metadata queues.get_all queues.get_all_ex queues.get_by_id queues.get_default queues.get_next_task queues.get_num_entries queues.get_queue_metrics queues.move_task_backward queues.move_task_forward queues.move_task_to_back queues.move_task_to_front queues.peek_task queues.remove_task queues.update reports.archive reports.create reports.delete reports.get_all_ex reports.get_tags reports.get_task_data reports.move reports.publish reports.unarchive reports.update server.config server.endpoints server.get_stats server.info server.report_stats_option tasks.add_or_update_artifacts tasks.add_or_update_model tasks.archive tasks.archive_many tasks.clone tasks.close tasks.completed tasks.create tasks.delete tasks.delete_artifacts tasks.delete_configuration tasks.delete_hyper_params tasks.delete_many tasks.delete_models tasks.dequeue tasks.dequeue_many tasks.edit tasks.edit_configuration tasks.edit_hyper_params tasks.enqueue tasks.enqueue_many tasks.failed tasks.get_all tasks.get_all_ex tasks.get_by_id tasks.get_by_id_ex tasks.get_configuration_names tasks.get_configurations tasks.get_hyper_params tasks.get_types tasks.make_private tasks.make_public tasks.move tasks.ping tasks.publish tasks.publish_many tasks.reset tasks.reset_many tasks.set_requirements tasks.started tasks.stop tasks.stop_many tasks.stopped tasks.unarchive_many tasks.update tasks.update_batch tasks.update_tags tasks.validate users.create users.delete users.get_all users.get_all_ex users.get_by_id users.get_current_user users.get_preferences users.set_preferences users.update workers.get_activity_report workers.get_all workers.get_count workers.get_metric_keys workers.get_stats workers.register workers.status_report workers.unregister
Loading config from /opt/clearml/apiserver/config/default
Loading config from file /opt/clearml/apiserver/config/default/logging.conf
Loading config from file /opt/clearml/apiserver/config/default/hosts.conf
Loading config from file /opt/clearml/apiserver/config/default/secure.conf
Loading config from file /opt/clearml/apiserver/config/default/apiserver.conf
Loading config from file /opt/clearml/apiserver/config/default/services/organization.conf
Loading config from file /opt/clearml/apiserver/config/default/services/models.conf
Loading config from file /opt/clearml/apiserver/config/default/services/_mongo.conf
Loading config from file /opt/clearml/apiserver/config/default/services/storage_credentials.conf
Loading config from file /opt/clearml/apiserver/config/default/services/tasks.conf
Loading config from file /opt/clearml/apiserver/config/default/services/auth.conf
Loading config from file /opt/clearml/apiserver/config/default/services/queues.conf
Loading config from file /opt/clearml/apiserver/config/default/services/events.conf
Loading config from file /opt/clearml/apiserver/config/default/services/projects.conf
Loading config from file /opt/clearml/apiserver/config/default/services/async_urls_delete.conf
Loading config from /opt/clearml/config
 * Serving Flask app 'server'
 * Debug mode: off
[2024-01-03 08:45:25,069] [9] [INFO] [clearml.service_repo] Returned 200 for debug.ping in 1ms
[2024-01-03 09:00:16,279] [9] [INFO] [clearml.non_responsive_tasks_watchdog] Starting cleanup cycle for running tasks last updated before 2024-01-03 07:00:16.279818
[2024-01-03 09:00:16,315] [9] [INFO] [clearml.non_responsive_tasks_watchdog] 0 non-responsive tasks found
[2024-01-03 09:00:16,315] [9] [INFO] [clearml.non_responsive_tasks_watchdog] 0 non-responsive tasks stopped

Test

docker compose ls
NAME                STATUS              CONFIG FILES
clearml-server             running(8)          /opt/clearml/docker-compose.yml

If you want to test that the webserver can correctly receive request locally, you can run (Testing of Nginx server block):

curl http://localhost:8080
Successful result for the cmd
<!doctype html>
<html lang="en" data-critters-container>
<head>
  <meta charset="utf-8">
  <title>ClearML</title>
  <base href="/">
  <meta name="viewport" content="width=device-width, initial-scale=1, shrink-to-fit=no">
  <link rel="icon" type="image/x-icon" href="favicon.ico?v=7">
  <link href="app/webapp-common/assets/fonts/heebo.css" rel="stylesheet" media="print" onload="this.media='all'"><noscript><link rel="stylesheet" href="app/webapp-common/assets/fonts/heebo.css"></noscript>
  <link rel="preload" href="app/webapp-common/assets/fonts/Heebo-Bold.ttf" as="font" type="font/ttf" crossorigin>
  <link rel="preload" href="app/webapp-common/assets/fonts/Heebo-Light.ttf" as="font" type="font/ttf" crossorigin>
  <link rel="preload" href="app/webapp-common/assets/fonts/Heebo-Medium.ttf" as="font" type="font/ttf" crossorigin>
  <link rel="preload" href="app/webapp-common/assets/fonts/Heebo-Regular.ttf" as="font" type="font/ttf" crossorigin>
  <link rel="preload" href="app/webapp-common/assets/fonts/Heebo-Thin.ttf" as="font" type="font/ttf" crossorigin>
  <script>
    if (global === undefined) {
      var global = window;
    }
  </script>
  <script src="env.js"></script>
<style>html{--mat-expansion-header-text-font:Heebo, sans-serif;--mat-expansion-header-text-size:14px;--mat-expansion-header-text-weight:500;--mat-expansion-header-text-line-height:inherit;--mat-expansion-header-text-tracking:inherit;--mat-expansion-container-text-font:Heebo, sans-serif;--mat-expansion-container-text-line-height:20px;--mat-expansion-container-text-size:14px;--mat-expansion-container-text-tracking:.0178571429em;--mat-expansion-container-text-weight:400}html{--mat-stepper-container-text-font:Heebo, sans-serif;--mat-stepper-header-label-text-font:Heebo, sans-serif;--mat-stepper-header-label-text-size:14px;--mat-stepper-header-label-text-weight:400;--mat-stepper-header-error-state-label-text-size:16px;--mat-stepper-header-selected-state-label-text-size:16px;--mat-stepper-header-selected-state-label-text-weight:400}html{--mat-option-label-text-font:Heebo, sans-serif;--mat-option-label-text-line-height:24px;--mat-option-label-text-size:16px;--mat-option-label-text-tracking:.03125em;--mat-option-label-text-weight:400}html{--mat-optgroup-label-text-font:Heebo, sans-serif;--mat-optgroup-label-text-line-height:24px;--mat-optgroup-label-text-size:16px;--mat-optgroup-label-text-tracking:.03125em;--mat-optgroup-label-text-weight:400}html{--mat-paginator-container-text-font:Heebo, sans-serif;--mat-paginator-container-text-line-height:20px;--mat-paginator-container-text-size:12px;--mat-paginator-container-text-tracking:.0333333333em;--mat-paginator-container-text-weight:400;--mat-paginator-select-trigger-text-size:12px}html{--mat-menu-item-label-text-color:rgba(0, 0, 0, .87);--mat-menu-item-icon-color:rgba(0, 0, 0, .87);--mat-menu-item-hover-state-layer-color:rgba(0, 0, 0, .04);--mat-menu-item-focus-state-layer-color:rgba(0, 0, 0, .04);--mat-menu-container-color:white}html{--mat-menu-item-label-text-font:Heebo, sans-serif;--mat-menu-item-label-text-size:16px;--mat-menu-item-label-text-tracking:.03125em;--mat-menu-item-label-text-line-height:24px;--mat-menu-item-label-text-weight:400}html{--mat-autocomplete-background-color:white}html{--mat-select-panel-background-color:white;--mat-select-enabled-trigger-text-color:rgba(0, 0, 0, .87);--mat-select-disabled-trigger-text-color:rgba(0, 0, 0, .38);--mat-select-placeholder-text-color:rgba(0, 0, 0, .6);--mat-select-enabled-arrow-color:rgba(0, 0, 0, .54);--mat-select-disabled-arrow-color:rgba(0, 0, 0, .38);--mat-select-focused-arrow-color:rgba(56, 65, 97, .87);--mat-select-invalid-arrow-color:rgba(244, 67, 54, .87)}html{--mat-select-trigger-text-font:Heebo, sans-serif;--mat-select-trigger-text-line-height:24px;--mat-select-trigger-text-size:16px;--mat-select-trigger-text-tracking:.03125em;--mat-select-trigger-text-weight:400}.dark-theme{--mdc-typography-body1-letter-spacing:0;--mdc-typography-button-letter-spacing:0}.dark-theme{--mat-option-selected-state-label-text-color:#384161;--mat-option-label-text-color:white;--mat-option-hover-state-layer-color:rgba(255, 255, 255, .08);--mat-option-focus-state-layer-color:rgba(255, 255, 255, .08);--mat-option-selected-state-layer-color:rgba(255, 255, 255, .08)}.dark-theme{--mat-optgroup-label-text-color:white}.dark-theme{--mat-option-label-text-font:Heebo, sans-serif;--mat-option-label-text-line-height:24px;--mat-option-label-text-size:16px;--mat-option-label-text-tracking:.03125em;--mat-option-label-text-weight:400}.dark-theme{--mat-optgroup-label-text-font:Heebo, sans-serif;--mat-optgroup-label-text-line-height:24px;--mat-optgroup-label-text-size:16px;--mat-optgroup-label-text-tracking:.03125em;--mat-optgroup-label-text-weight:400}.dark-theme{--mdc-checkbox-disabled-selected-icon-color:rgba(255, 255, 255, .38);--mdc-checkbox-disabled-unselected-icon-color:rgba(255, 255, 255, .38);--mdc-checkbox-selected-checkmark-color:#fff;--mdc-checkbox-selected-focus-icon-color:#707ba3;--mdc-checkbox-selected-hover-icon-color:#707ba3;--mdc-checkbox-selected-icon-color:#707ba3;--mdc-checkbox-selected-pressed-icon-color:#707ba3;--mdc-checkbox-unselected-focus-icon-color:#eeeeee;--mdc-checkbox-unselected-hover-icon-color:#eeeeee;--mdc-checkbox-unselected-icon-color:rgba(255, 255, 255, .54);--mdc-checkbox-unselected-pressed-icon-color:rgba(255, 255, 255, .54);--mdc-checkbox-selected-focus-state-layer-color:#707ba3;--mdc-checkbox-selected-hover-state-layer-color:#707ba3;--mdc-checkbox-selected-pressed-state-layer-color:#707ba3;--mdc-checkbox-unselected-focus-state-layer-color:white;--mdc-checkbox-unselected-hover-state-layer-color:white;--mdc-checkbox-unselected-pressed-state-layer-color:white}.dark-theme{--mdc-checkbox-state-layer-size:32px}*{outline:none!important}html,body{height:100%;margin:0;padding:0;font-family:Heebo,sans-serif;font-size:14px;overflow:hidden}.dark-theme{--bs-border-width:1px}.dark-theme *,.dark-theme *:before,.dark-theme *:after{box-sizing:border-box}@media (prefers-reduced-motion: no-preference){.dark-theme :root{scroll-behavior:smooth}}.dark-theme ::-moz-focus-inner{padding:0;border-style:none}.dark-theme ::-webkit-datetime-edit-fields-wrapper,.dark-theme ::-webkit-datetime-edit-text,.dark-theme ::-webkit-datetime-edit-minute,.dark-theme ::-webkit-datetime-edit-hour-field,.dark-theme ::-webkit-datetime-edit-day-field,.dark-theme ::-webkit-datetime-edit-month-field,.dark-theme ::-webkit-datetime-edit-year-field{padding:0}.dark-theme ::-webkit-inner-spin-button{height:auto}.dark-theme ::-webkit-search-decoration{-webkit-appearance:none}.dark-theme ::-webkit-color-swatch-wrapper{padding:0}.dark-theme ::file-selector-button{font:inherit;-webkit-appearance:button}.dark-theme :root{--bs-breakpoint-xs:0;--bs-breakpoint-sm:576px;--bs-breakpoint-md:768px;--bs-breakpoint-lg:992px;--bs-breakpoint-xl:1200px;--bs-breakpoint-xxl:1400px}.dark-theme :root{--bs-blue:#0d6efd;--bs-indigo:#6610f2;--bs-purple:#4d66ff;--bs-pink:#d63384;--bs-red:#dc3545;--bs-orange:#fd7e14;--bs-yellow:#ffc107;--bs-green:#198754;--bs-teal:#20c997;--bs-cyan:#0dcaf0;--bs-black:#000000;--bs-white:#fff;--bs-gray:#6c757d;--bs-gray-dark:#343a40;--bs-gray-100:#f8f9fa;--bs-gray-200:#e9ecef;--bs-gray-300:#dee2e6;--bs-gray-400:#ced4da;--bs-gray-500:#adb5bd;--bs-gray-600:#6c757d;--bs-gray-700:#495057;--bs-gray-800:#343a40;--bs-gray-900:#212529;--bs-primary:#2c3246;--bs-secondary:#6c757d;--bs-success:#198754;--bs-info:#0dcaf0;--bs-warning:#ffc107;--bs-danger:#dc3545;--bs-light:#f8f9fa;--bs-dark:#212529;--bs-primary-rgb:44, 50, 70;--bs-secondary-rgb:108, 117, 125;--bs-success-rgb:25, 135, 84;--bs-info-rgb:13, 202, 240;--bs-warning-rgb:255, 193, 7;--bs-danger-rgb:220, 53, 69;--bs-light-rgb:248, 249, 250;--bs-dark-rgb:33, 37, 41;--bs-primary-text-emphasis:#12141c;--bs-secondary-text-emphasis:#2b2f32;--bs-success-text-emphasis:#0a3622;--bs-info-text-emphasis:#055160;--bs-warning-text-emphasis:#664d03;--bs-danger-text-emphasis:#58151c;--bs-light-text-emphasis:#495057;--bs-dark-text-emphasis:#495057;--bs-primary-bg-subtle:#d5d6da;--bs-secondary-bg-subtle:#e2e3e5;--bs-success-bg-subtle:#d1e7dd;--bs-info-bg-subtle:#cff4fc;--bs-warning-bg-subtle:#fff3cd;--bs-danger-bg-subtle:#f8d7da;--bs-light-bg-subtle:#fcfcfd;--bs-dark-bg-subtle:#ced4da;--bs-primary-border-subtle:#abadb5;--bs-secondary-border-subtle:#c4c8cb;--bs-success-border-subtle:#a3cfbb;--bs-info-border-subtle:#9eeaf9;--bs-warning-border-subtle:#ffe69c;--bs-danger-border-subtle:#f1aeb5;--bs-light-border-subtle:#e9ecef;--bs-dark-border-subtle:#adb5bd;--bs-white-rgb:255, 255, 255;--bs-black-rgb:0, 0, 0;--bs-font-sans-serif:system-ui, -apple-system, "Segoe UI", Roboto, "Helvetica Neue", "Noto Sans", "Liberation Sans", Arial, sans-serif, "Apple Color Emoji", "Segoe UI Emoji", "Segoe UI Symbol", "Noto Color Emoji";--bs-font-monospace:SFMono-Regular, Menlo, Monaco, Consolas, "Liberation Mono", "Courier New", monospace;--bs-gradient:linear-gradient(180deg, rgba(255, 255, 255, .15), rgba(255, 255, 255, 0));--bs-body-font-family:"Heebo", sans-serif;--bs-body-font-size:1rem;--bs-body-font-weight:400;--bs-body-line-height:1.5;--bs-body-color:#212529;--bs-body-color-rgb:33, 37, 41;--bs-body-bg:#fff;--bs-body-bg-rgb:255, 255, 255;--bs-emphasis-color:#000000;--bs-emphasis-color-rgb:0, 0, 0;--bs-secondary-color:rgba(33, 37, 41, .75);--bs-secondary-color-rgb:33, 37, 41;--bs-secondary-bg:#e9ecef;--bs-secondary-bg-rgb:233, 236, 239;--bs-tertiary-color:rgba(33, 37, 41, .5);--bs-tertiary-color-rgb:33, 37, 41;--bs-tertiary-bg:#f8f9fa;--bs-tertiary-bg-rgb:248, 249, 250;--bs-heading-color:inherit;--bs-link-color:#8492c2;--bs-link-color-rgb:132, 146, 194;--bs-link-decoration:none;--bs-link-hover-color:#c3cdf0;--bs-link-hover-color-rgb:195, 205, 240;--bs-code-color:#d63384;--bs-highlight-color:#212529;--bs-highlight-bg:#fff3cd;--bs-border-width:1px;--bs-border-style:solid;--bs-border-color:#dee2e6;--bs-border-color-translucent:rgba(0, 0, 0, .175);--bs-border-radius:.25rem;--bs-border-radius-sm:.2rem;--bs-border-radius-lg:.3rem;--bs-border-radius-xl:1rem;--bs-border-radius-xxl:2rem;--bs-border-radius-2xl:var(--bs-border-radius-xxl);--bs-border-radius-pill:50rem;--bs-box-shadow:0 .5rem 1rem rgba(0, 0, 0, .15);--bs-box-shadow-sm:0 .125rem .25rem rgba(0, 0, 0, .075);--bs-box-shadow-lg:0 1rem 3rem rgba(0, 0, 0, .175);--bs-box-shadow-inset:inset 0 1px 2px rgba(0, 0, 0, .075);--bs-focus-ring-width:.25rem;--bs-focus-ring-opacity:.25;--bs-focus-ring-color:rgba(44, 50, 70, .25);--bs-form-valid-color:#198754;--bs-form-valid-border-color:#198754;--bs-form-invalid-color:#dc3545;--bs-form-invalid-border-color:#dc3545}.dark-theme{--mat-select-trigger-text-size:14px;--mat-select-trigger-text-tracking:0;--mat-option-label-text-size:14px;--mat-option-label-text-tracking:0;--mat-option-label-text-line-height:32px}*{scrollbar-width:thin}html,body{height:100%;margin:0;padding:0}html .dark-theme{scrollbar-color:#404865 transparent}html .dark-theme ::-webkit-scrollbar{width:14px;height:14px}html .dark-theme ::-webkit-scrollbar-track{background:transparent}html .dark-theme ::-webkit-scrollbar-thumb{min-height:32px;min-width:32px;border-style:solid;border-color:transparent;border-width:4px;border-radius:14px;background-clip:padding-box}html .dark-theme ::-webkit-scrollbar-thumb{background-color:#404865}html .dark-theme ::-webkit-scrollbar-thumb:hover{background-color:#535f85}html .dark-theme::-webkit-scrollbar-thumb{background-color:#404865}html .dark-theme ::-webkit-scrollbar-corner{background-color:transparent}html .dark-theme{background:#1a1e2c;color:#a4adcd}@media print{*{color:#000!important}html,body{overflow:visible!important}}:root{--fa-style-family-classic:"Font Awesome 6 Free";--fa-font-solid:normal 900 1em/1 "Font Awesome 6 Free"}@font-face{font-family:"Font Awesome 6 Free";font-style:normal;font-weight:900;font-display:block;src:url(fa-solid-900.3eae9857c06e9372.woff2) format("woff2"),url(fa-solid-900.0b5caff7ad4bc179.ttf) format("truetype")}:root{--fa-style-family-classic:"Font Awesome 6 Free";--fa-font-regular:normal 400 1em/1 "Font Awesome 6 Free"}@font-face{font-family:"Font Awesome 6 Free";font-style:normal;font-weight:400;font-display:block;src:url(fa-regular-400.02ad4ff91ef84f65.woff2) format("woff2"),url(fa-regular-400.570a165b064c1468.ttf) format("truetype")}:root{--fa-style-family-brands:"Font Awesome 6 Brands";--fa-font-brands:normal 400 1em/1 "Font Awesome 6 Brands"}@font-face{font-family:"Font Awesome 6 Brands";font-style:normal;font-weight:400;font-display:block;src:url(fa-brands-400.9210030c21e68a90.woff2) format("woff2"),url(fa-brands-400.5f7c5bb77eae788b.ttf) format("truetype")}</style><link rel="stylesheet" href="styles.f70b271bd0570db9.css" media="print" onload="this.media='all'"><noscript><link rel="stylesheet" href="styles.f70b271bd0570db9.css"></noscript></head>
<body class="dark-theme">
  <sm-root></sm-root>
  <noscript>Please enable JavaScript to continue using this application.</noscript>
<script src="runtime.99f4c516b7b7516a.js" type="module"></script><script src="polyfills.92e024c1797a0c2c.js" type="module"></script><script src="scripts.c4499c33ea66af9e.js" defer></script><script src="vendor.c9a05133074768db.js" type="module"></script><script src="main.a023060989894def.js" type="module"></script></body>
<footer>
</footer>
</html>

You can also see that the curl request arrived to the webserver container by checking the log of the webserver container:

docker logs clearml-webserver
172.25.0.1 - - [21/Feb/2024:09:11:52 +0000] "GET / HTTP/1.1" 200 13327 "-" "curl/7.81.0"

Checking the containers related to docker compose

From How to show all running containers created by docker-compose, globally, regardless of docker-compose.yml
...

’’

Docker compose adds labels to each container that it creates. If you want to get all containers created by compose, you can perform a container ls and apply a filter.

docker container ls --filter label=com.docker.compose.project

This will show all running container created by compose, regardless of the project name.

For example, I created some containers from different compose projects. With the filter, I get only those, but no other container that have not been created by compose and therefore don’t have a project label.

$ base='\t\t\t\t\t\t'
$ compose='\t'

$ docker container ls --all \
  --filter label=com.docker.compose.project \
  --format "table $compose\t$base"

project        service     STATUS                      CONTAINER ID   NAMES                IMAGE                   PORTS                                                                     NETWORKS               MOUNTS
kafka          kafka       Up 5 minutes                3f97a460266e   kafka_kafka_1        bitnami/kafka:3         0.0.0.0:9092->9092/tcp, :::9092->9092/tcp                                 kafka_default          kafka_kafka_da…,kafka_kafa_con…
kafka          zookeeper   Up 5 minutes                0b6f32ccd196   kafka_zookeeper_1    bitnami/zookeeper:3.7   2888/tcp, 3888/tcp, 0.0.0.0:2181->2181/tcp, :::2181->2181/tcp, 8080/tcp   kafka_default          kafka_zookeepe…
manager        db          Up 22 minutes               4f0e799b4fd7   manager_db_1         da2cb49d7a8d            5432/tcp                                                                  manager_default        0d667a0e48a280…
foo            db          Exited (0) 37 minutes ago   e106c5cdbf5e   foo_db_1             da2cb49d7a8d                                                                                      foo_default            5a87e93627b8f6…
foo            backend     Up 10 minutes               08a0873c0587   foo_backend_2        c316d5a335a5            80/tcp                                                                    foo_default            
foo            frontend    Up 10 minutes               be723bf41aeb   foo_frontend_1       c316d5a335a5            80/tcp                                                                    foo_default            
foo            backend     Up 10 minutes               5d91d4bcfcb3   foo_backend_1        c316d5a335a5            80/tcp                                                                    foo_default            
manager        app         Up 22 minutes               2ca4c0920807   manager_app_1        c316d5a335a5            80/tcp                                                                    manager_default        
manager        app         Up 22 minutes               b2fa2b9724b0   manager_app_2        c316d5a335a5            80/tcp                                                                    manager_default        
loadbalancer   app         Exited (0) 37 minutes ago   791f4059b4af   loadbalancer_app_1   c316d5a335a5                                                                                      loadbalancer_default   

If you want to see all container regardless of their state, you can add the --all or short -a flag to the ls command, like I did in my example. Otherwise, only running containers are shown. ‘’

docker compose ls
Output
NAME                STATUS              CONFIG FILES
clearml-server      running(7)          /opt/clearml/docker-compose.yml
docker compose -p clearml-server ps
Output
NAME                 IMAGE                                                  COMMAND                  SERVICE         CREATED       STATUS      PORTS
async_delete         allegroai/clearml:latest                               "python3 -m jobs.asy…"   async_delete    10 days ago   Up 6 days   8008/tcp, 8080-8081/tcp
clearml-apiserver    allegroai/clearml:latest                               "/opt/clearml/wrappe…"   apiserver       10 days ago   Up 6 days   0.0.0.0:8008->8008/tcp, :::8008->8008/tcp, 8080-8081/tcp
clearml-elastic      docker.elastic.co/elasticsearch/elasticsearch:7.17.7   "/bin/tini -- /usr/l…"   elasticsearch   10 days ago   Up 6 days   9200/tcp, 9300/tcp
clearml-fileserver   allegroai/clearml:latest                               "/opt/clearml/wrappe…"   fileserver      10 days ago   Up 6 days   8008/tcp, 8080/tcp, 0.0.0.0:8081->8081/tcp, :::8081->8081/tcp
clearml-mongo        mongo:4.4.9                                            "docker-entrypoint.s…"   mongo           10 days ago   Up 6 days   27017/tcp
clearml-redis        redis:5.0                                              "docker-entrypoint.s…"   redis           10 days ago   Up 6 days   6379/tcp
clearml-webserver    allegroai/clearml:latest                               "/opt/clearml/wrappe…"   webserver       10 days ago   Up 6 days   8008/tcp, 8080-8081/tcp, 0.0.0.0:8080->80/tcp, :::8080->80/tcp
base='\t\t\t\t\t\t'
compose='\t'
docker container ls --all \
  --filter label=com.docker.compose.project \
  --format "table $compose\t$base"
Output
project          service          STATUS                   CONTAINER ID   NAMES                    IMAGE                                                  PORTS                                                            NETWORKS                                         MOUNTS
clearml-server   async_delete     Up 6 days                28193acf6809   async_delete             allegroai/clearml:latest                               8008/tcp, 8080-8081/tcp                                          clearml-server_backend                           /opt/clearml/c…,/opt/clearml/l…
clearml-server   webserver        Up 6 days                63d0cbcb95bd   clearml-webserver        allegroai/clearml:latest                               8008/tcp, 8080-8081/tcp, 0.0.0.0:8080->80/tcp, :::8080->80/tcp   clearml-server_backend,clearml-server_frontend   
clearml-server   agent-services   Exited (0) 10 days ago   5cc0bae2f9c5   clearml-agent-services   allegroai/clearml-agent-services:latest                                                                                 clearml-server_backend                           /opt/clearml/a…,/var/run/docke…
clearml-server   apiserver        Up 6 days                2079cf9751ce   clearml-apiserver        allegroai/clearml:latest                               0.0.0.0:8008->8008/tcp, :::8008->8008/tcp, 8080-8081/tcp         clearml-server_backend,clearml-server_frontend   /opt/clearml/d…,/opt/clearml/c…,/opt/clearml/l…
clearml-server   fileserver       Up 6 days                f6ea532b389d   clearml-fileserver       allegroai/clearml:latest                               8008/tcp, 8080/tcp, 0.0.0.0:8081->8081/tcp, :::8081->8081/tcp    clearml-server_frontend,clearml-server_backend   /opt/clearml/d…,/opt/clearml/c…,/opt/clearml/l…
clearml-server   elasticsearch    Up 6 days                497b644c1ec5   clearml-elastic          docker.elastic.co/elasticsearch/elasticsearch:7.17.7   9200/tcp, 9300/tcp                                               clearml-server_backend                           6d7b0a8e50a22d…,/opt/clearml/d…
clearml-server   redis            Up 6 days                83d55d3ab741   clearml-redis            redis:5.0                                              6379/tcp                                                         clearml-server_backend                           /opt/clearml/d…
clearml-server   mongo            Up 6 days                a035887594b0   clearml-mongo            mongo:4.4.9                                            27017/tcp                                                        clearml-server_backend                           /opt/clearml/d…,/opt/clearml/d…

Web Login Authentication (Step 0 - 2/2)

0
  • Secure ClearML-server [preliminary] - Web Login Authentication
[Back to Steps]

We will come back to this and expand more and the security actions required in later parts (6 HTTPS, 7 Web Login Authentication using hashed passwords, 8 Server Credentials and Secrets, 9 Securing ClearML Server – File Server Security). But for now, let’s just create a basic user with a clear temporary password for test purposes, until we finish the basic set-ups.

From ClearML Docs – Web Login Authentication

’’ Web login authentication can be configured in the ClearML Server in order to permit only users provided with credentials to access the ClearML system. Those credentials are a username and password.

Without web login authentication, ClearML Server does not restrict access (by default).

To add web login authentication to the ClearML Server:

  1. In ClearML Server /opt/clearml/config/apiserver.conf, add the auth.fixed_users section and specify the users.

    For example:

     auth {
         # Fixed users login credentials
         # No other user will be able to login
         fixed_users {
             enabled: true
             pass_hashed: false
             users: [
                 {
                     username: "jane"
                     password: "12345678"
                     name: "Jane Doe"
                 },
                 {
                     username: "john"
                     password: "12345678"
                     name: "John Doe"
                 },
             ]
         }
      }
    

    If the apiserver.conf file does not exist, create your own in ClearML Server’s /opt/clearml/config directory (or an alternate folder you configured), and input the modified configuration

  2. Restart ClearML Server. ‘’

On Workstation Red:
Add the following to /opt/clearml/config/apiserver.conf (or create the file if not present yet) modifying the username, name and password to your needs:

auth {
  # Fixed users login credentials
  # No other user will be able to login
  fixed_users {
    enabled: true
    pass_hashed: false
    users: [
      {
        username: "RR5555"
        password: "my_password"
        name: "RR5555"
      },
    ]
  }
}

Then restart ClearML Server.

Reverse tunneling/port forwarding (Step 1)

1
Forward the ports to the proxy server [Back to Steps]

Forward the relevant ports to blissfox_pi (Ports: 8080, 8008, 8081) using a service (Following Reverse-tunneling to bypass a firewall with no fixed IP adress – Configure autossh as a systemd service)

  • clearml_app-tunnel.service: 8080

    [Unit]
    Description=AutoSSH tunnel service Remote port 8080 to local 8080
    Wants=network-online.target
    After=network-online.target
    StartLimitIntervalSec=0
    
    [Service]
    User=workstation_user
    Environment="AUTOSSH_GATETIME=0"
    ExecStart=/usr/bin/autossh -M 0 -o "ServerAliveInterval 30" -o "ServerAliveCountMax 3" -o "ConnectTimeout 10" -o "ExitOnForwardFailure yes" -N -q -T -R 8080:localhost:8080 proxy_user@proxy.blissfox.xyz -p 22
    Restart=always
    RestartSec=10
    
    [Install]
    WantedBy=multi-user.target

    Change:

    • workstation_user: to the Workstation user
    • proxy_user: to the Proxy Pi user
  • clearml_api-tunnel.service: 8008

  • clearml_files-tunnel.service: 8081

Cmd log:

vim clearml_app-tunnel.service
vim clearml_api-tunnel.service
vim clearml_files-tunnel.service
cat *.service
chmod 777 clearml_app-tunnel.service
chmod 777 clearml_api-tunnel.service 
chmod 777 clearml_files-tunnel.service 
sudo mv clearml_app-tunnel.service /etc/systemd/system/
sudo mv clearml_api-tunnel.service /etc/systemd/system/
sudo mv clearml_files-tunnel.service /etc/systemd/system/
sudo systemctl enable clearml_app-tunnel.service
sudo systemctl enable clearml_api-tunnel.service 
sudo systemctl enable clearml_files-tunnel.service 
systemctl daemon-reload 
systemctl start clearml_app-tunnel.service 
systemctl enable clearml_app-tunnel.service 
systemctl start clearml_api-tunnel.service 
systemctl enable clearml_api-tunnel.service 
systemctl start clearml_files-tunnel.service 
systemctl enable clearml_files-tunnel.service 

Test

On Red: You can check the ports 8080, 8081, and 8008 are listening

# Check ipv4 all ports
sudo lsof -Pn -i4
# Check ipv4 port 8080
sudo lsof -Pn -i4:8080
# Check ipv4 ports 8080, 8081, 8008 TCP in LISTEN state
sudo lsof -Pn -i4:8080,8081,8008 -sTCP:LISTEN

lsof (LiSt Open Files): ‘‘It’s commonly said that in Linux, everything is a file.’‘[1]; ‘‘An open file may be a regular file, a directory, a block special file, a character special file, an executing text reference, a library, a stream or a network file (Internet socket, NFS file or UNIX domain socket.) A specific file or all the files in a file system may be selected by path.’‘[2]

  • -i4: ‘‘If -i4 or -i6 is specified with no following address, only files of the indicated IP version, IPv4 or IPv6, are displayed.’‘[2]
  • -n: ‘‘This option inhibits the conversion of network numbers to host names for network files. Inhibiting conversion may make lsof run faster. It is also useful when host name lookup is not working properly.’‘[2]
  • -P: ‘‘This option inhibits the conversion of port numbers to port names for network files. Inhibiting the conversion may make lsof run a little faster. It is also useful when port name lookup is not working properly.’‘[2]
  • -iTCP -sTCP:LISTEN: ‘‘to list only network files with TCP state LISTEN’‘[2]
  • -i [i]: ‘‘An Internet address is specified in the form (Items in square brackets are optional.):
    [*46*][*protocol*][@*hostname*|*hostaddr*][:*service*|*port*]
    

    ’’

See RedHat [1] RedHat – How to use the lsof command to troubleshoot Linux or [2] lsof(8) - Linux man page for reference.

sudo lsof -Pn -i4:8080,8081,8008 -sTCP:LISTEN
COMMAND      PID USER   FD   TYPE  DEVICE SIZE/OFF NODE NAME
docker-pr 606804 root    4u  IPv4 3108859      0t0  TCP *:8008 (LISTEN)
docker-pr 606890 root    4u  IPv4 3110629      0t0  TCP *:8081 (LISTEN)
docker-pr 606993 root    4u  IPv4 3112555      0t0  TCP *:8080 (LISTEN)
$ curl http://localhost:8080
Successful result for the cmd
<!doctype html>
<html lang="en" data-critters-container>
<head>
  <meta charset="utf-8">
  <title>ClearML</title>
  <base href="/">
  <meta name="viewport" content="width=device-width, initial-scale=1, shrink-to-fit=no">
  <link rel="icon" type="image/x-icon" href="favicon.ico?v=7">
  <link href="app/webapp-common/assets/fonts/heebo.css" rel="stylesheet" media="print" onload="this.media='all'"><noscript><link rel="stylesheet" href="app/webapp-common/assets/fonts/heebo.css"></noscript>
  <link rel="preload" href="app/webapp-common/assets/fonts/Heebo-Bold.ttf" as="font" type="font/ttf" crossorigin>
  <link rel="preload" href="app/webapp-common/assets/fonts/Heebo-Light.ttf" as="font" type="font/ttf" crossorigin>
  <link rel="preload" href="app/webapp-common/assets/fonts/Heebo-Medium.ttf" as="font" type="font/ttf" crossorigin>
  <link rel="preload" href="app/webapp-common/assets/fonts/Heebo-Regular.ttf" as="font" type="font/ttf" crossorigin>
  <link rel="preload" href="app/webapp-common/assets/fonts/Heebo-Thin.ttf" as="font" type="font/ttf" crossorigin>
  <script>
    if (global === undefined) {
      var global = window;
    }
  </script>
  <script src="env.js"></script>
<style>html{--mat-expansion-header-text-font:Heebo, sans-serif;--mat-expansion-header-text-size:14px;--mat-expansion-header-text-weight:500;--mat-expansion-header-text-line-height:inherit;--mat-expansion-header-text-tracking:inherit;--mat-expansion-container-text-font:Heebo, sans-serif;--mat-expansion-container-text-line-height:20px;--mat-expansion-container-text-size:14px;--mat-expansion-container-text-tracking:.0178571429em;--mat-expansion-container-text-weight:400}html{--mat-stepper-container-text-font:Heebo, sans-serif;--mat-stepper-header-label-text-font:Heebo, sans-serif;--mat-stepper-header-label-text-size:14px;--mat-stepper-header-label-text-weight:400;--mat-stepper-header-error-state-label-text-size:16px;--mat-stepper-header-selected-state-label-text-size:16px;--mat-stepper-header-selected-state-label-text-weight:400}html{--mat-option-label-text-font:Heebo, sans-serif;--mat-option-label-text-line-height:24px;--mat-option-label-text-size:16px;--mat-option-label-text-tracking:.03125em;--mat-option-label-text-weight:400}html{--mat-optgroup-label-text-font:Heebo, sans-serif;--mat-optgroup-label-text-line-height:24px;--mat-optgroup-label-text-size:16px;--mat-optgroup-label-text-tracking:.03125em;--mat-optgroup-label-text-weight:400}html{--mat-paginator-container-text-font:Heebo, sans-serif;--mat-paginator-container-text-line-height:20px;--mat-paginator-container-text-size:12px;--mat-paginator-container-text-tracking:.0333333333em;--mat-paginator-container-text-weight:400;--mat-paginator-select-trigger-text-size:12px}html{--mat-menu-item-label-text-color:rgba(0, 0, 0, .87);--mat-menu-item-icon-color:rgba(0, 0, 0, .87);--mat-menu-item-hover-state-layer-color:rgba(0, 0, 0, .04);--mat-menu-item-focus-state-layer-color:rgba(0, 0, 0, .04);--mat-menu-container-color:white}html{--mat-menu-item-label-text-font:Heebo, sans-serif;--mat-menu-item-label-text-size:16px;--mat-menu-item-label-text-tracking:.03125em;--mat-menu-item-label-text-line-height:24px;--mat-menu-item-label-text-weight:400}html{--mat-autocomplete-background-color:white}html{--mat-select-panel-background-color:white;--mat-select-enabled-trigger-text-color:rgba(0, 0, 0, .87);--mat-select-disabled-trigger-text-color:rgba(0, 0, 0, .38);--mat-select-placeholder-text-color:rgba(0, 0, 0, .6);--mat-select-enabled-arrow-color:rgba(0, 0, 0, .54);--mat-select-disabled-arrow-color:rgba(0, 0, 0, .38);--mat-select-focused-arrow-color:rgba(56, 65, 97, .87);--mat-select-invalid-arrow-color:rgba(244, 67, 54, .87)}html{--mat-select-trigger-text-font:Heebo, sans-serif;--mat-select-trigger-text-line-height:24px;--mat-select-trigger-text-size:16px;--mat-select-trigger-text-tracking:.03125em;--mat-select-trigger-text-weight:400}.dark-theme{--mdc-typography-body1-letter-spacing:0;--mdc-typography-button-letter-spacing:0}.dark-theme{--mat-option-selected-state-label-text-color:#384161;--mat-option-label-text-color:white;--mat-option-hover-state-layer-color:rgba(255, 255, 255, .08);--mat-option-focus-state-layer-color:rgba(255, 255, 255, .08);--mat-option-selected-state-layer-color:rgba(255, 255, 255, .08)}.dark-theme{--mat-optgroup-label-text-color:white}.dark-theme{--mat-option-label-text-font:Heebo, sans-serif;--mat-option-label-text-line-height:24px;--mat-option-label-text-size:16px;--mat-option-label-text-tracking:.03125em;--mat-option-label-text-weight:400}.dark-theme{--mat-optgroup-label-text-font:Heebo, sans-serif;--mat-optgroup-label-text-line-height:24px;--mat-optgroup-label-text-size:16px;--mat-optgroup-label-text-tracking:.03125em;--mat-optgroup-label-text-weight:400}.dark-theme{--mdc-checkbox-disabled-selected-icon-color:rgba(255, 255, 255, .38);--mdc-checkbox-disabled-unselected-icon-color:rgba(255, 255, 255, .38);--mdc-checkbox-selected-checkmark-color:#fff;--mdc-checkbox-selected-focus-icon-color:#707ba3;--mdc-checkbox-selected-hover-icon-color:#707ba3;--mdc-checkbox-selected-icon-color:#707ba3;--mdc-checkbox-selected-pressed-icon-color:#707ba3;--mdc-checkbox-unselected-focus-icon-color:#eeeeee;--mdc-checkbox-unselected-hover-icon-color:#eeeeee;--mdc-checkbox-unselected-icon-color:rgba(255, 255, 255, .54);--mdc-checkbox-unselected-pressed-icon-color:rgba(255, 255, 255, .54);--mdc-checkbox-selected-focus-state-layer-color:#707ba3;--mdc-checkbox-selected-hover-state-layer-color:#707ba3;--mdc-checkbox-selected-pressed-state-layer-color:#707ba3;--mdc-checkbox-unselected-focus-state-layer-color:white;--mdc-checkbox-unselected-hover-state-layer-color:white;--mdc-checkbox-unselected-pressed-state-layer-color:white}.dark-theme{--mdc-checkbox-state-layer-size:32px}*{outline:none!important}html,body{height:100%;margin:0;padding:0;font-family:Heebo,sans-serif;font-size:14px;overflow:hidden}.dark-theme{--bs-border-width:1px}.dark-theme *,.dark-theme *:before,.dark-theme *:after{box-sizing:border-box}@media (prefers-reduced-motion: no-preference){.dark-theme :root{scroll-behavior:smooth}}.dark-theme ::-moz-focus-inner{padding:0;border-style:none}.dark-theme ::-webkit-datetime-edit-fields-wrapper,.dark-theme ::-webkit-datetime-edit-text,.dark-theme ::-webkit-datetime-edit-minute,.dark-theme ::-webkit-datetime-edit-hour-field,.dark-theme ::-webkit-datetime-edit-day-field,.dark-theme ::-webkit-datetime-edit-month-field,.dark-theme ::-webkit-datetime-edit-year-field{padding:0}.dark-theme ::-webkit-inner-spin-button{height:auto}.dark-theme ::-webkit-search-decoration{-webkit-appearance:none}.dark-theme ::-webkit-color-swatch-wrapper{padding:0}.dark-theme ::file-selector-button{font:inherit;-webkit-appearance:button}.dark-theme :root{--bs-breakpoint-xs:0;--bs-breakpoint-sm:576px;--bs-breakpoint-md:768px;--bs-breakpoint-lg:992px;--bs-breakpoint-xl:1200px;--bs-breakpoint-xxl:1400px}.dark-theme :root{--bs-blue:#0d6efd;--bs-indigo:#6610f2;--bs-purple:#4d66ff;--bs-pink:#d63384;--bs-red:#dc3545;--bs-orange:#fd7e14;--bs-yellow:#ffc107;--bs-green:#198754;--bs-teal:#20c997;--bs-cyan:#0dcaf0;--bs-black:#000000;--bs-white:#fff;--bs-gray:#6c757d;--bs-gray-dark:#343a40;--bs-gray-100:#f8f9fa;--bs-gray-200:#e9ecef;--bs-gray-300:#dee2e6;--bs-gray-400:#ced4da;--bs-gray-500:#adb5bd;--bs-gray-600:#6c757d;--bs-gray-700:#495057;--bs-gray-800:#343a40;--bs-gray-900:#212529;--bs-primary:#2c3246;--bs-secondary:#6c757d;--bs-success:#198754;--bs-info:#0dcaf0;--bs-warning:#ffc107;--bs-danger:#dc3545;--bs-light:#f8f9fa;--bs-dark:#212529;--bs-primary-rgb:44, 50, 70;--bs-secondary-rgb:108, 117, 125;--bs-success-rgb:25, 135, 84;--bs-info-rgb:13, 202, 240;--bs-warning-rgb:255, 193, 7;--bs-danger-rgb:220, 53, 69;--bs-light-rgb:248, 249, 250;--bs-dark-rgb:33, 37, 41;--bs-primary-text-emphasis:#12141c;--bs-secondary-text-emphasis:#2b2f32;--bs-success-text-emphasis:#0a3622;--bs-info-text-emphasis:#055160;--bs-warning-text-emphasis:#664d03;--bs-danger-text-emphasis:#58151c;--bs-light-text-emphasis:#495057;--bs-dark-text-emphasis:#495057;--bs-primary-bg-subtle:#d5d6da;--bs-secondary-bg-subtle:#e2e3e5;--bs-success-bg-subtle:#d1e7dd;--bs-info-bg-subtle:#cff4fc;--bs-warning-bg-subtle:#fff3cd;--bs-danger-bg-subtle:#f8d7da;--bs-light-bg-subtle:#fcfcfd;--bs-dark-bg-subtle:#ced4da;--bs-primary-border-subtle:#abadb5;--bs-secondary-border-subtle:#c4c8cb;--bs-success-border-subtle:#a3cfbb;--bs-info-border-subtle:#9eeaf9;--bs-warning-border-subtle:#ffe69c;--bs-danger-border-subtle:#f1aeb5;--bs-light-border-subtle:#e9ecef;--bs-dark-border-subtle:#adb5bd;--bs-white-rgb:255, 255, 255;--bs-black-rgb:0, 0, 0;--bs-font-sans-serif:system-ui, -apple-system, "Segoe UI", Roboto, "Helvetica Neue", "Noto Sans", "Liberation Sans", Arial, sans-serif, "Apple Color Emoji", "Segoe UI Emoji", "Segoe UI Symbol", "Noto Color Emoji";--bs-font-monospace:SFMono-Regular, Menlo, Monaco, Consolas, "Liberation Mono", "Courier New", monospace;--bs-gradient:linear-gradient(180deg, rgba(255, 255, 255, .15), rgba(255, 255, 255, 0));--bs-body-font-family:"Heebo", sans-serif;--bs-body-font-size:1rem;--bs-body-font-weight:400;--bs-body-line-height:1.5;--bs-body-color:#212529;--bs-body-color-rgb:33, 37, 41;--bs-body-bg:#fff;--bs-body-bg-rgb:255, 255, 255;--bs-emphasis-color:#000000;--bs-emphasis-color-rgb:0, 0, 0;--bs-secondary-color:rgba(33, 37, 41, .75);--bs-secondary-color-rgb:33, 37, 41;--bs-secondary-bg:#e9ecef;--bs-secondary-bg-rgb:233, 236, 239;--bs-tertiary-color:rgba(33, 37, 41, .5);--bs-tertiary-color-rgb:33, 37, 41;--bs-tertiary-bg:#f8f9fa;--bs-tertiary-bg-rgb:248, 249, 250;--bs-heading-color:inherit;--bs-link-color:#8492c2;--bs-link-color-rgb:132, 146, 194;--bs-link-decoration:none;--bs-link-hover-color:#c3cdf0;--bs-link-hover-color-rgb:195, 205, 240;--bs-code-color:#d63384;--bs-highlight-color:#212529;--bs-highlight-bg:#fff3cd;--bs-border-width:1px;--bs-border-style:solid;--bs-border-color:#dee2e6;--bs-border-color-translucent:rgba(0, 0, 0, .175);--bs-border-radius:.25rem;--bs-border-radius-sm:.2rem;--bs-border-radius-lg:.3rem;--bs-border-radius-xl:1rem;--bs-border-radius-xxl:2rem;--bs-border-radius-2xl:var(--bs-border-radius-xxl);--bs-border-radius-pill:50rem;--bs-box-shadow:0 .5rem 1rem rgba(0, 0, 0, .15);--bs-box-shadow-sm:0 .125rem .25rem rgba(0, 0, 0, .075);--bs-box-shadow-lg:0 1rem 3rem rgba(0, 0, 0, .175);--bs-box-shadow-inset:inset 0 1px 2px rgba(0, 0, 0, .075);--bs-focus-ring-width:.25rem;--bs-focus-ring-opacity:.25;--bs-focus-ring-color:rgba(44, 50, 70, .25);--bs-form-valid-color:#198754;--bs-form-valid-border-color:#198754;--bs-form-invalid-color:#dc3545;--bs-form-invalid-border-color:#dc3545}.dark-theme{--mat-select-trigger-text-size:14px;--mat-select-trigger-text-tracking:0;--mat-option-label-text-size:14px;--mat-option-label-text-tracking:0;--mat-option-label-text-line-height:32px}*{scrollbar-width:thin}html,body{height:100%;margin:0;padding:0}html .dark-theme{scrollbar-color:#404865 transparent}html .dark-theme ::-webkit-scrollbar{width:14px;height:14px}html .dark-theme ::-webkit-scrollbar-track{background:transparent}html .dark-theme ::-webkit-scrollbar-thumb{min-height:32px;min-width:32px;border-style:solid;border-color:transparent;border-width:4px;border-radius:14px;background-clip:padding-box}html .dark-theme ::-webkit-scrollbar-thumb{background-color:#404865}html .dark-theme ::-webkit-scrollbar-thumb:hover{background-color:#535f85}html .dark-theme::-webkit-scrollbar-thumb{background-color:#404865}html .dark-theme ::-webkit-scrollbar-corner{background-color:transparent}html .dark-theme{background:#1a1e2c;color:#a4adcd}@media print{*{color:#000!important}html,body{overflow:visible!important}}:root{--fa-style-family-classic:"Font Awesome 6 Free";--fa-font-solid:normal 900 1em/1 "Font Awesome 6 Free"}@font-face{font-family:"Font Awesome 6 Free";font-style:normal;font-weight:900;font-display:block;src:url(fa-solid-900.3eae9857c06e9372.woff2) format("woff2"),url(fa-solid-900.0b5caff7ad4bc179.ttf) format("truetype")}:root{--fa-style-family-classic:"Font Awesome 6 Free";--fa-font-regular:normal 400 1em/1 "Font Awesome 6 Free"}@font-face{font-family:"Font Awesome 6 Free";font-style:normal;font-weight:400;font-display:block;src:url(fa-regular-400.02ad4ff91ef84f65.woff2) format("woff2"),url(fa-regular-400.570a165b064c1468.ttf) format("truetype")}:root{--fa-style-family-brands:"Font Awesome 6 Brands";--fa-font-brands:normal 400 1em/1 "Font Awesome 6 Brands"}@font-face{font-family:"Font Awesome 6 Brands";font-style:normal;font-weight:400;font-display:block;src:url(fa-brands-400.9210030c21e68a90.woff2) format("woff2"),url(fa-brands-400.5f7c5bb77eae788b.ttf) format("truetype")}</style><link rel="stylesheet" href="styles.f70b271bd0570db9.css" media="print" onload="this.media='all'"><noscript><link rel="stylesheet" href="styles.f70b271bd0570db9.css"></noscript></head>
<body class="dark-theme">
  <sm-root></sm-root>
  <noscript>Please enable JavaScript to continue using this application.</noscript>
<script src="runtime.99f4c516b7b7516a.js" type="module"></script><script src="polyfills.92e024c1797a0c2c.js" type="module"></script><script src="scripts.c4499c33ea66af9e.js" defer></script><script src="vendor.c9a05133074768db.js" type="module"></script><script src="main.a023060989894def.js" type="module"></script></body>
<footer>
</footer>
</html>

Otherwise: timeout

NGINX (Step 2)

2
Set a Reverse Proxy [Back to Steps]
From Cloudfare What is a reverse proxy?

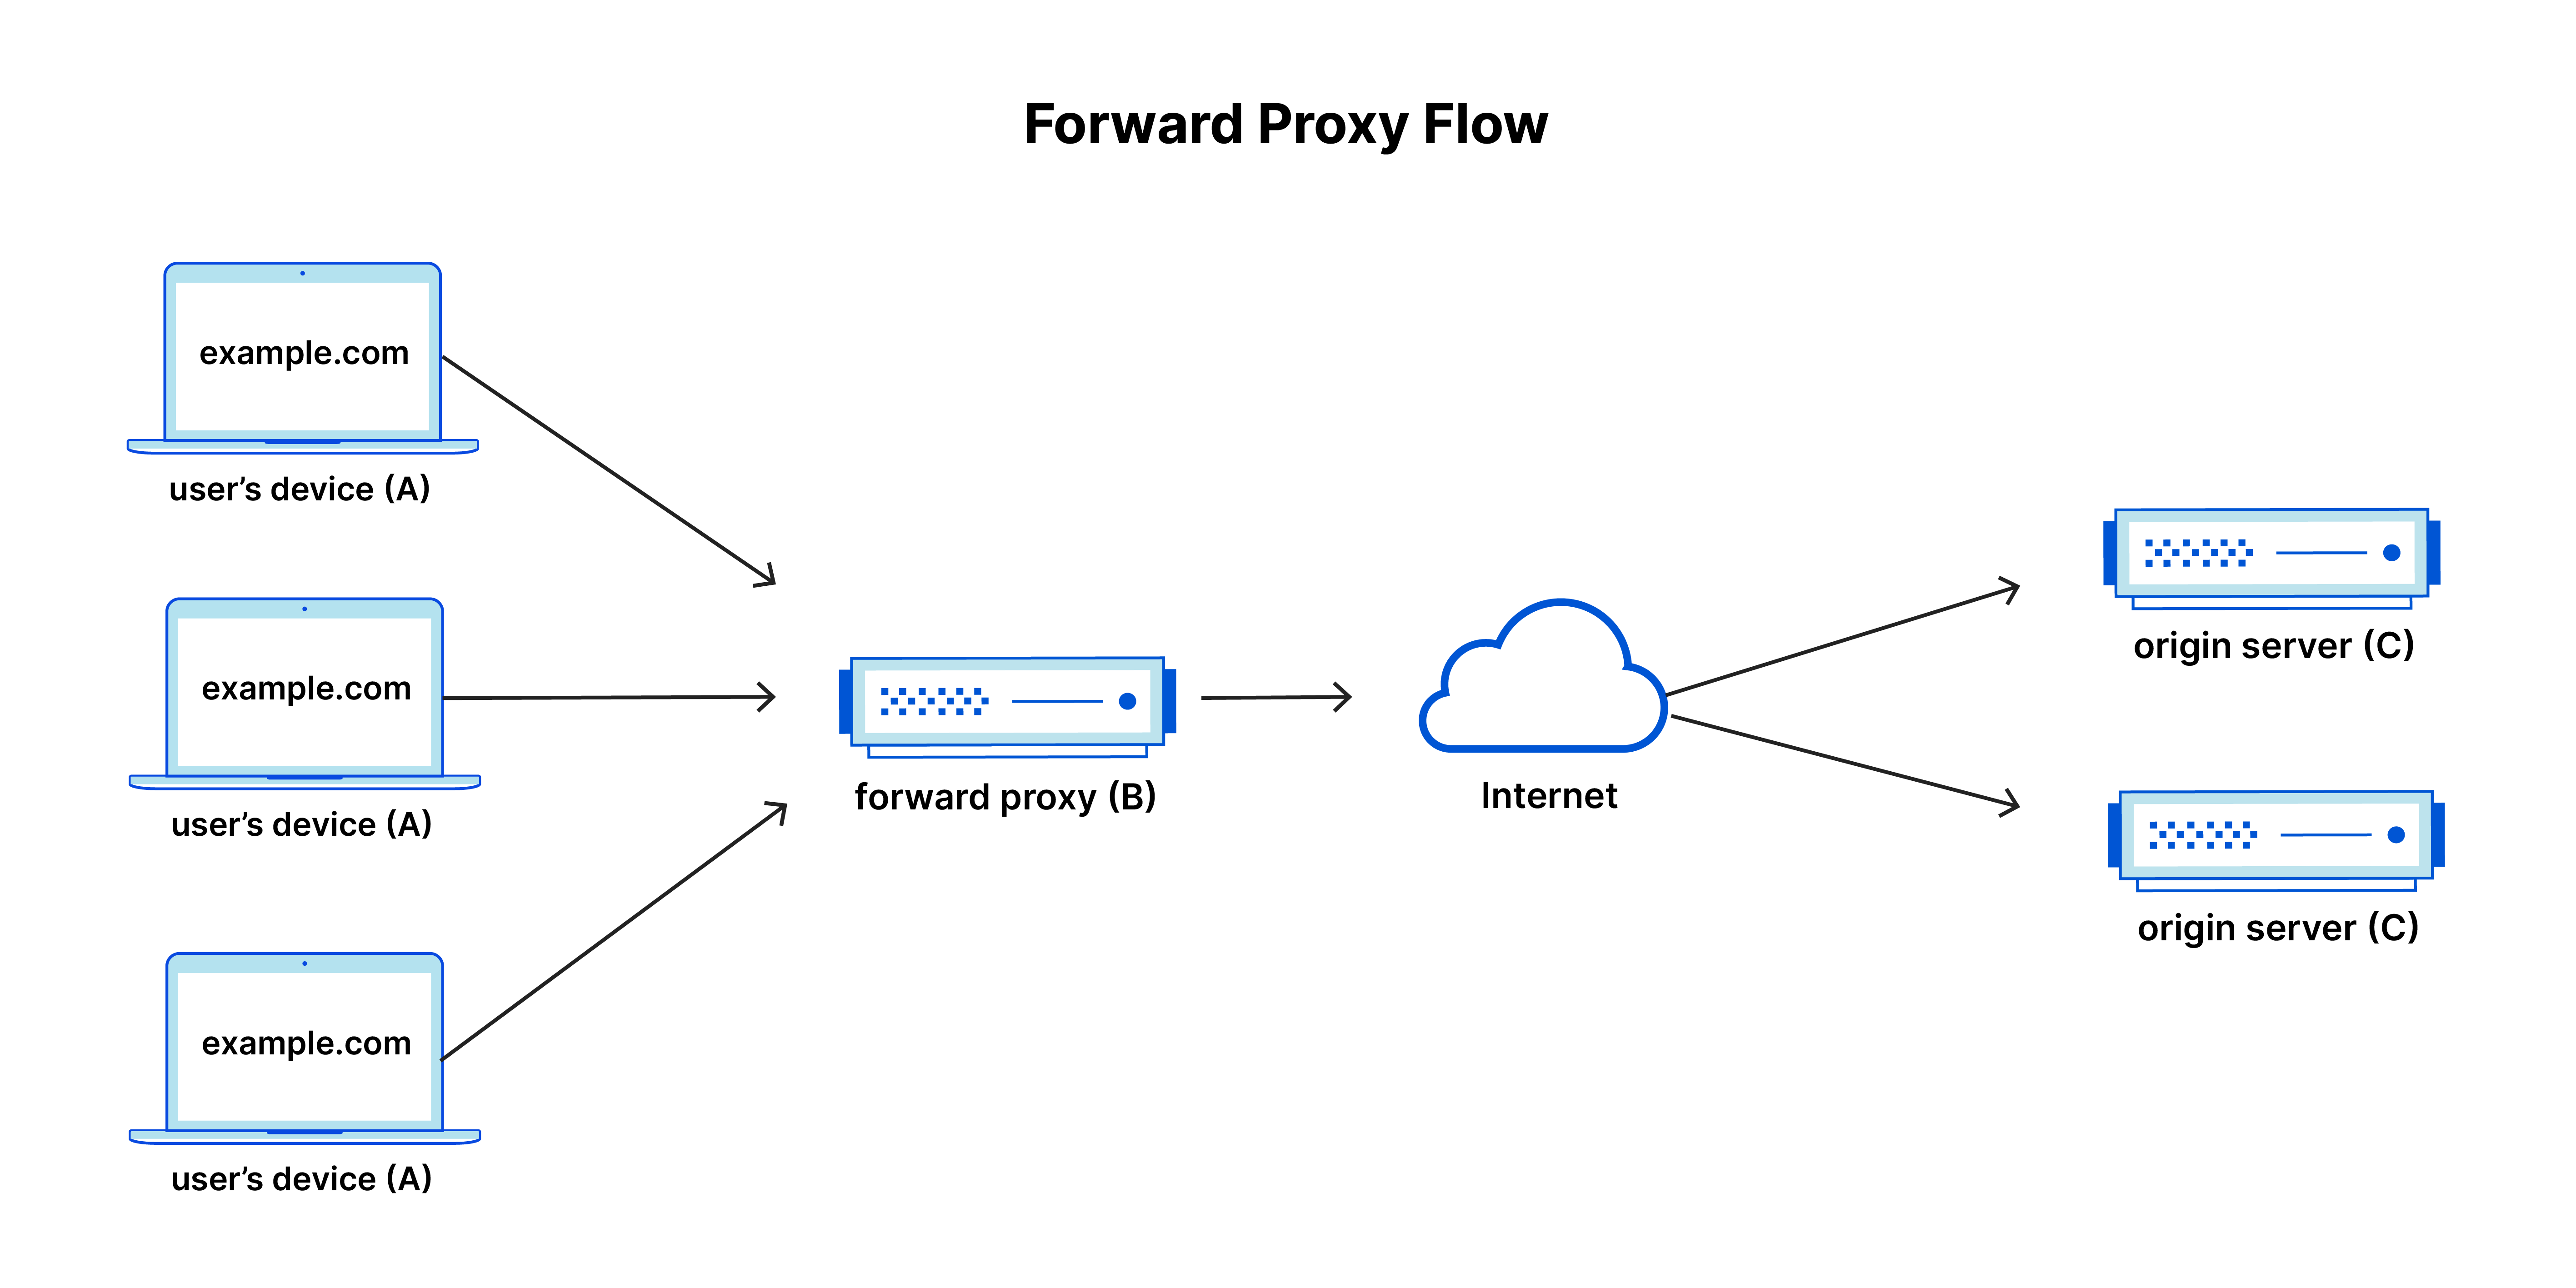
’’ A forward proxy, often called a proxy, proxy server, or web proxy, is a server that sits in front of a group of client machines. When those computers make requests to sites and services on the Internet, the proxy server intercepts those requests and then communicates with web servers on behalf of those clients, like a middleman.

[…]

[…]

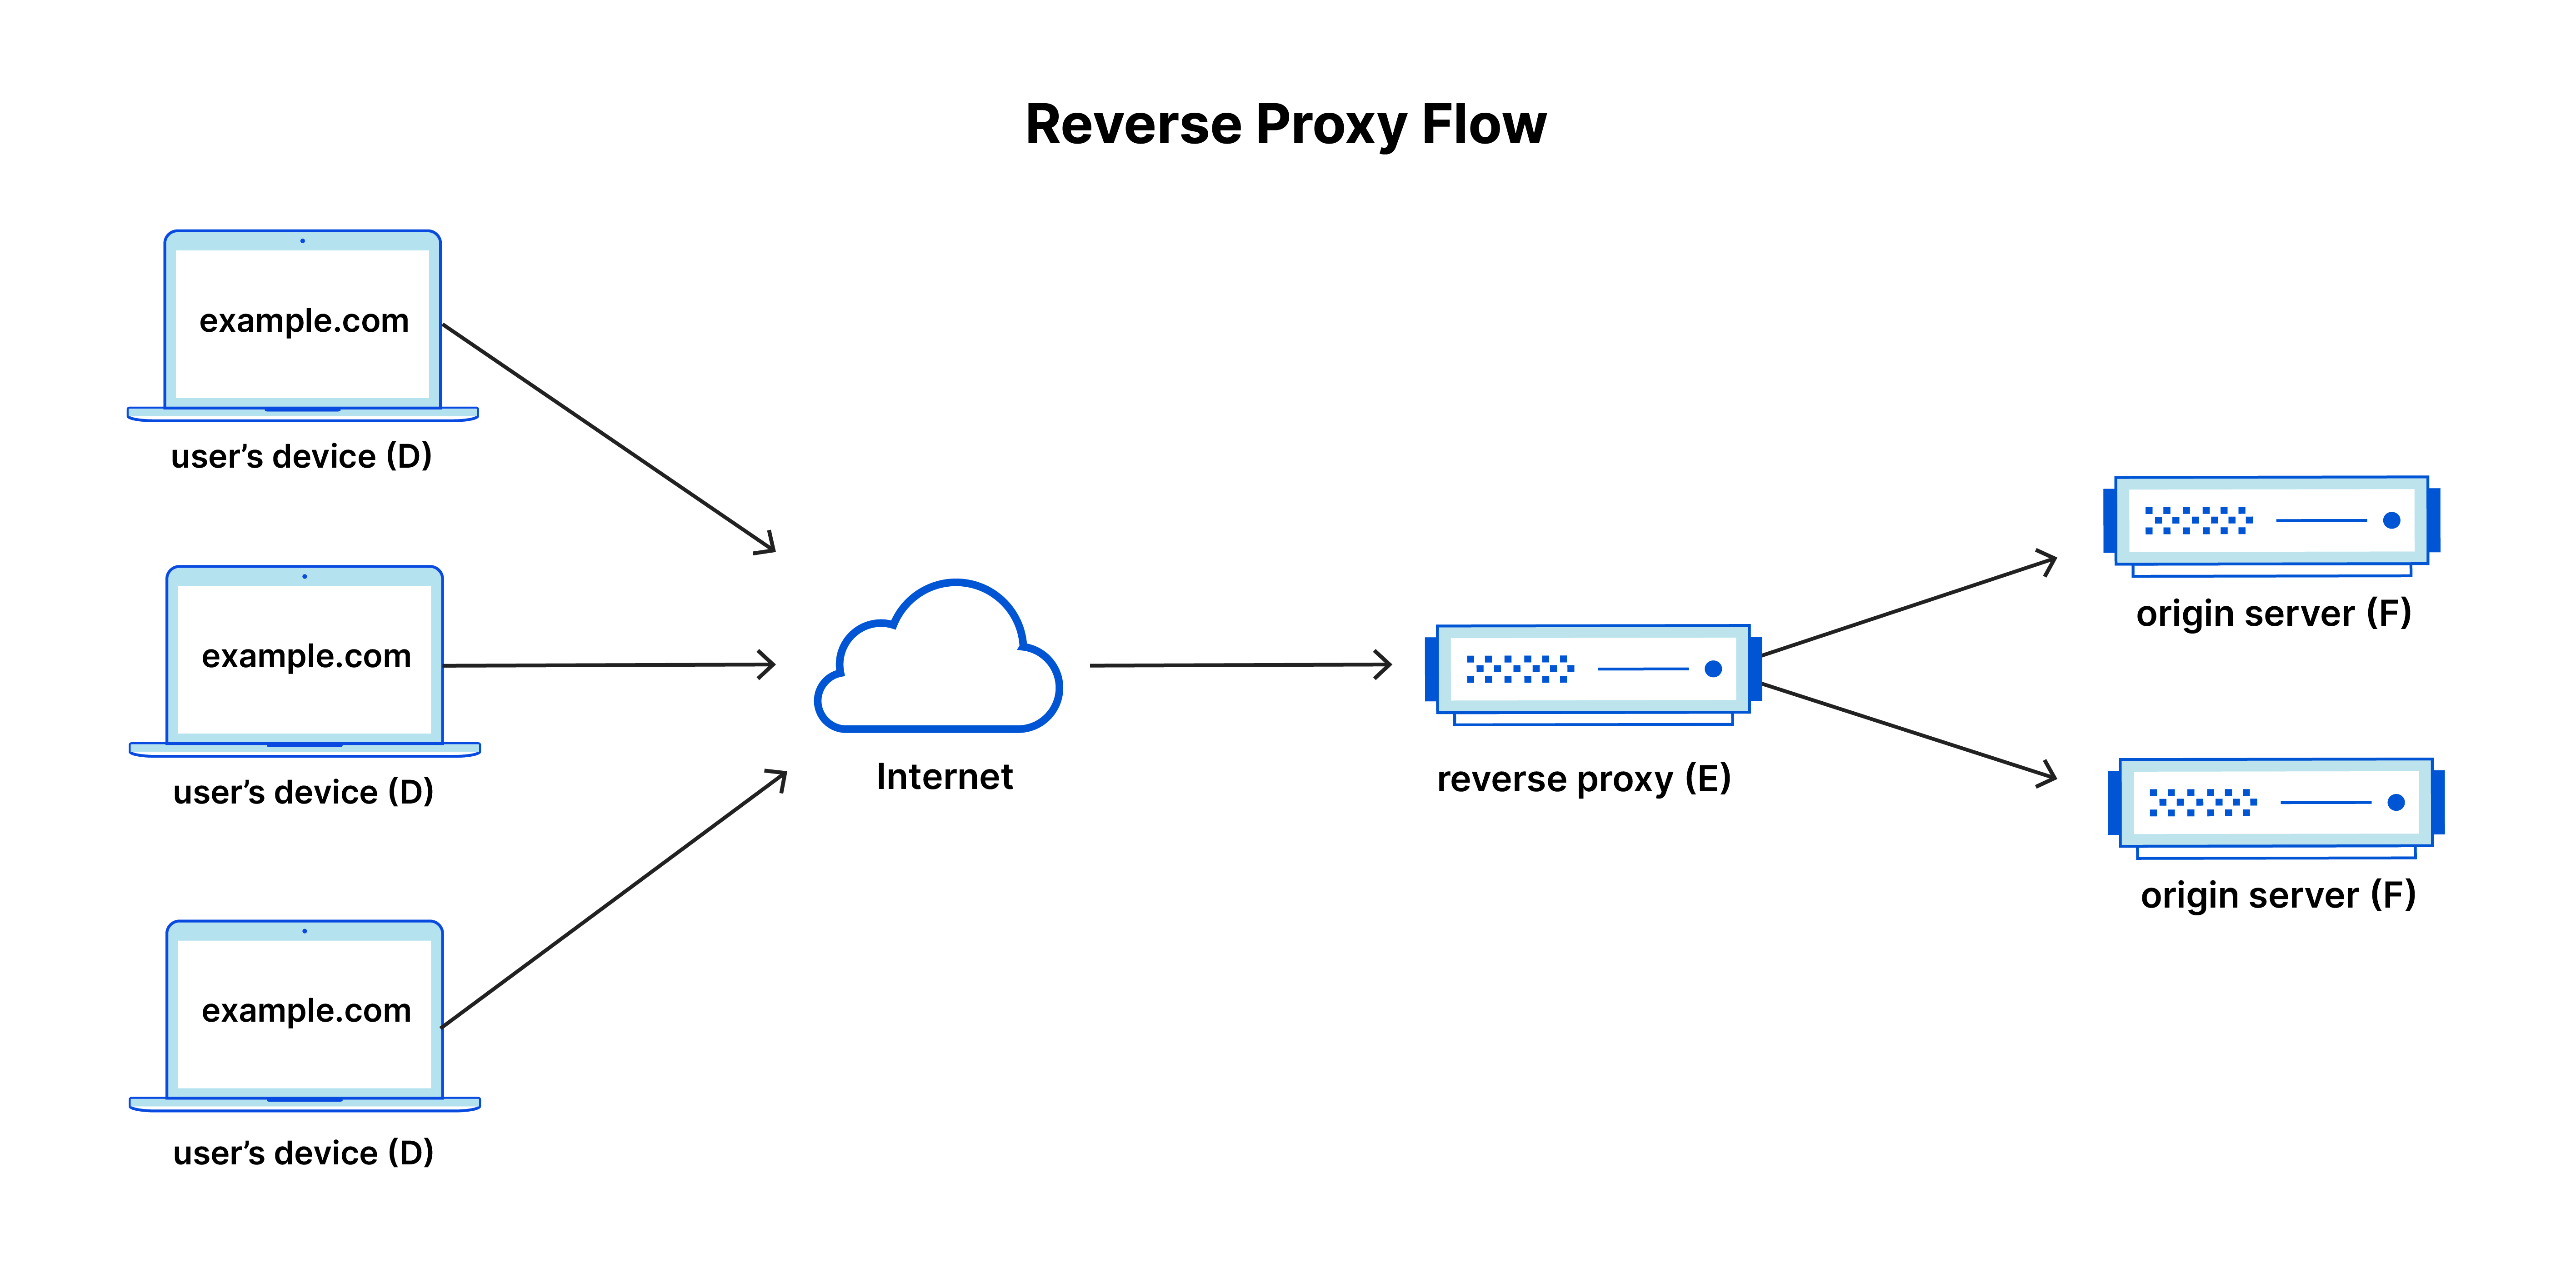
A reverse proxy is a server that sits in front of one or more web servers, intercepting requests from clients. This is different from a forward proxy, where the proxy sits in front of the clients. With a reverse proxy, when clients send requests to the origin server of a website, those requests are intercepted at the network edge by the reverse proxy server. The reverse proxy server will then send requests to and receive responses from the origin server.

The difference between a forward and reverse proxy is subtle but important. A simplified way to sum it up would be to say that a forward proxy sits in front of a client and ensures that no origin server ever communicates directly with that specific client. On the other hand, a reverse proxy sits in front of an origin server and ensures that no client ever communicates directly with that origin server.

[…]

[…]

’’

  1. Install NGINX on pi and start it:

    From Build your own Raspberry Pi NGINX Web Server

    ’’

    […]

    We should also run the following command to uninstall Apache2 since there is a chance that it is pre-installed on your system.

    Failing to do so can cause the installation to fail since it automatically starts up and utilizes port 80 since we intend on using NGINX as a web server we choose to remove it from the system.

    sudo apt remove apache2
    

    […]

    sudo apt install nginx
    sudo systemctl start nginx
    

    You can check that nginx is running with the following command:

    systemctl status nginx
    

    nginx logs can be checked at /var/log/nginx/

    See DigitalOcean How To Troubleshoot Common Nginx Errors for more details on how to troubleshoot Nginx.

  2. Configure NGINX

    • Create: /etc/nginx/sites-available/clearml.conf (sudo required to create/edit this file)

      server_names_hash_bucket_size  64;
      server {
              listen 80;
              listen [::]:80;
              server_name app_clearml.blissfox.xyz;
      
              location / {
                      proxy_pass http://localhost:8080;
              }
      }
      
      server {
              listen 80;
              listen [::]:80;
              server_name api_clearml.blissfox.xyz;
      
              location / {
                      proxy_pass http://localhost:8008;
              }
      }
      
      server {
              listen 80;
              listen [::]:80;
              server_name files_clearml.blissfox.xyz;
      
              location / {
                      proxy_pass http://localhost:8081;
              }
      }

      For sources, see:

      The line:

      server_names_hash_bucket_size  64;
      

      is necessary to solve the following problem, which ‘‘is most likely happening because of the long domain name’’:

      sudo nginx -t -c /etc/nginx/nginx.conf 
      nginx: [emerg] could not build server_names_hash, you should increase server_names_hash_bucket_size: 32
      nginx: configuration file /etc/nginx/nginx.conf test failed
      

      64 is enough here, if more needed, note that ‘‘the directive value should be increased to the next power of two.’’.

      See nginx: [emerg] could not build the server_names_hash, you should increase server_names_hash_bucket_size – Jap Mul’s answer for sources.

      To test the nginx config file correctness:

      sudo nginx -t -c /etc/nginx/nginx.conf
      

      When checking if the .conf is correct, do not cast the cmd directly on the /etc/nginx/sites-available/clearml.conf:

      sudo nginx -t -c /etc/nginx/sites-available/clearml.conf
      

      Resulting in:

      nginx: [emerg] "server_names_hash_bucket_size" directive is not allowed here in /etc/nginx/sites-available/clearml.conf:3
      nginx: configuration file /etc/nginx/sites-available/clearml.conf test failed
      

      (Basically faulting the very first directive encountered, as it should normally be encapsulated in other directive, if it was a stand-alone file.)\ But on /etc/nginx/nginx.conf instead, the former will be inlcuded, as is, in the latter:

      sudo nginx -t -c /etc/nginx/nginx.conf
      

      Resulting in:

      nginx: the configuration file /etc/nginx/nginx.conf syntax is ok
      nginx: configuration file /etc/nginx/nginx.conf test is successful
      
    • Create symbolic link:

      sudo ln -s /etc/nginx/sites-available/clearml.conf /etc/nginx/sites-enabled/clearml.conf
      
    • nginx graceful restart to reload the config:

      sudo systemctl reload nginx
      

      For a discussion on how to deal with the nginx service, see:

      For a synthesis on what is the difference between sudo service nginx restart, sudo systemctl reload nginx & sudo nginx -s reload:

      Cmd Using Related to Type of Restart
      sudo systemctl restart nginx systemctl systemd Forcefully
      sudo systemctl reload nginx systemctl systemd Gracefully
      • sudo service nginx restart(Linux Newer Version)
      • sudo /etc/init.d/nginx restart(Linux Older Version)
      • sudo nginx -s restart(Equivalent)
      • service nginx
      • /etc/init.d/nginx
      • nginx
      System V init script -> /usr/sbin/nginx Forcefully
      • sudo service nginx reload(Linux Newer Version)
      • sudo /etc/init.d/nginx reload(Linux Older Version)
      • sudo nginx -s reload(Equivalent)
      • service nginx
      • /etc/init.d/nginx
      • nginx
      System V init script -> /usr/sbin/nginx Gracefully

      For checking and disambiguation, in addition to the sources above, see also:

      type nginx
      man nginx
      man /etc/init.d/nginx
      man service nginx
      

      and boot launch enabling:

      sudo systemctl enable nginx
      
      From How to Start, Stop, and Restart Nginx (systemctl & Nginx Commands) – 1.4 Configure Nginx to Launch on Boot

      ’’

      1.4 Configure Nginx to Launch on Boot

      Use the enable option with the systemctl command to enable Nginx:

      sudo systemctl enable nginx
      

      Use the disable option with the systemctl command to disable Nginx:

      sudo systemctl disable nginx
      

      ’’

How to verify if nginx is running or not

  • curl localhost:80
    
    Output (positive)
    <!DOCTYPE html>
    <html>
    <head>
    <title>Welcome to nginx!</title>
    <style>
        body {
            width: 35em;
            margin: 0 auto;
            font-family: Tahoma, Verdana, Arial, sans-serif;
        }
    </style>
    </head>
    <body>
    <h1>Welcome to nginx!</h1>
    <p>If you see this page, the nginx web server is successfully installed and
    working. Further configuration is required.</p>
      
    <p>For online documentation and support please refer to
    <a href="http://nginx.org/">nginx.org</a>.<br/>
    Commercial support is available at
    <a href="http://nginx.com/">nginx.com</a>.</p>
      
    <p><em>Thank you for using nginx.</em></p>
    </body>
    </html>
    
    Output (negative)
    curl: (7) Failed to connect to localhost port 80 after 0 ms: Connection refused
    

How to verify if nginx is running or not?:

  • '’Will work on a non-systemd based version’’:
    service nginx status
    
    Output
    ● nginx.service - A high performance web server and a reverse proxy server
         Loaded: loaded (/lib/systemd/system/nginx.service; enabled; vendor preset: enabled)
         Active: active (running) since Tue 2024-05-14 09:13:28 KST; 2 weeks 5 days ago
           Docs: man:nginx(8)
       Main PID: 656 (nginx)
          Tasks: 5 (limit: 1595)
            CPU: 1h 14min 5.109s
         CGroup: /system.slice/nginx.service
                 ├─ 656 nginx: master process /usr/sbin/nginx -g daemon on; master_process on;
                 ├─2582 nginx: worker process
                 ├─2583 nginx: worker process
                 ├─2584 nginx: worker process
                 └─2585 nginx: worker process
      
    May 14 09:13:26 proxy_host_name systemd[1]: Starting A high performance web server and a reverse proxy server...
    May 14 09:13:28 proxy_host_name systemd[1]: Started A high performance web server and a reverse proxy server.
    
  • '’On systemd based versions such as Ubuntu Linux 16.04 LTS and above, make use of the command below’’:
    systemctl status nginx
    
    Output
    ● nginx.service - A high performance web server and a reverse proxy server
         Loaded: loaded (/lib/systemd/system/nginx.service; enabled; vendor preset: enabled)
         Active: active (running) since Tue 2024-05-14 09:13:28 KST; 2 weeks 5 days ago
           Docs: man:nginx(8)                                                                                                                                                 Main PID: 656 (nginx)
          Tasks: 5 (limit: 1595)
            CPU: 1h 14min 5.971s
         CGroup: /system.slice/nginx.service
                 ├─ 656 nginx: master process /usr/sbin/nginx -g daemon on; master_process on;
                 ├─2582 nginx: worker process
                 ├─2583 nginx: worker process
                 ├─2584 nginx: worker process
                 └─2585 nginx: worker process
      
    May 14 09:13:26 proxy_host_name systemd[1]: Starting A high performance web server and a reverse proxy server...
    May 14 09:13:28 proxy_host_name systemd[1]: Started A high performance web server and a reverse proxy server.
    
    systemctl is-active nginx
    
    active
    

    '’You can use the exit value in your shell scripts as follows’’:

    systemctl -q is-active nginx && echo "It is active, do something"
    
  • '’Probably system-dependent’’:
    if [ -e /var/run/nginx.pid ]; then echo "nginx is running"; fi
    
    nginx is running
    
  • '’You could use lsof to see what application is listening on port 80’’:
    sudo lsof -i TCP:80
    
    Output
    COMMAND  PID     USER   FD   TYPE DEVICE SIZE/OFF NODE NAME
    nginx    656     root    6u  IPv4  12139      0t0  TCP *:http (LISTEN)
    nginx    656     root    7u  IPv6  12140      0t0  TCP *:http (LISTEN)
    nginx   2582 www-data    6u  IPv4  12139      0t0  TCP *:http (LISTEN)
    nginx   2582 www-data    7u  IPv6  12140      0t0  TCP *:http (LISTEN)
    nginx   2583 www-data    6u  IPv4  12139      0t0  TCP *:http (LISTEN)
    nginx   2583 www-data    7u  IPv6  12140      0t0  TCP *:http (LISTEN)
    nginx   2584 www-data    6u  IPv4  12139      0t0  TCP *:http (LISTEN)
    nginx   2584 www-data    7u  IPv6  12140      0t0  TCP *:http (LISTEN)
    nginx   2585 www-data    6u  IPv4  12139      0t0  TCP *:http (LISTEN)
    nginx   2585 www-data    7u  IPv6  12140      0t0  TCP *:http (LISTEN)
    

lsof -i TCP:80: Shows ‘‘what process uses a particular TCP port’’, here port 80

See previous note on lsof for more details and references.

  • '’None of the above answers worked for me so let me share my experience. I am running nginx in a docker container that has a port mapping (hostPort:containerPort) - 80:80 The above answers are giving me strange console output. Only the good old ‘nmap’ is working flawlessly even catching the nginx version. The command working for me is:
    nmap -sV localhost -p 80
    

    We are doing nmap using the -ServiceVersion switch on the localhost and port: 80. It works great for me. ‘’

'’Nmap is short for Network Mapper. It is an open-source Linux command-line tool that is used to scan IP addresses and ports in a network and to detect installed applications.

Nmap allows network admins to find which devices are running on their network, discover open ports and services, and detect vulnerabilities.’‘[1]

Regarding:

nmap -sV localhost -p 80
  • -p port ranges: ‘‘Only scan specified ports’‘[2]
  • -sV: Version detection’‘[2]

Thus, it is looking at port 80 on localhost and trying to detect the version of the service using the port.

See [1] What is Nmap and How to Use it – A Tutorial for the Greatest Scanning Tool of All Time, [2] nmap(1) - Linux man page for references.

To scratch the surface of nmap:

nmap -sV localhost -p 80
Output
Starting Nmap 7.80 ( https://nmap.org ) at 2024-06-02 19:51 KST
Nmap scan report for localhost (127.0.0.1)
Host is up (0.00065s latency).
Other addresses for localhost (not scanned): ::1

PORT   STATE SERVICE VERSION
80/tcp open  http    nginx 1.18.0

Service detection performed. Please report any incorrect results at https://nmap.org/submit/ .
Nmap done: 1 IP address (1 host up) scanned in 10.11 seconds
nmap -sV localhost -p 443
Output
Starting Nmap 7.80 ( https://nmap.org ) at 2024-06-02 19:52 KST
Nmap scan report for localhost (127.0.0.1)
Host is up (0.00066s latency).
Other addresses for localhost (not scanned): ::1

PORT    STATE SERVICE  VERSION
443/tcp open  ssl/http nginx 1.18.0

Service detection performed. Please report any incorrect results at https://nmap.org/submit/ .
Nmap done: 1 IP address (1 host up) scanned in 16.89 seconds
nmap -sV localhost -p 8080
Output
Starting Nmap 7.80 ( https://nmap.org ) at 2024-06-02 19:52 KST
Nmap scan report for localhost (127.0.0.1)
Host is up (0.00062s latency).
Other addresses for localhost (not scanned): ::1

PORT     STATE SERVICE VERSION
8080/tcp open  http    nginx 1.18.0

Service detection performed. Please report any incorrect results at https://nmap.org/submit/ .
Nmap done: 1 IP address (1 host up) scanned in 10.55 seconds

Example of a port not in use (and not ufw-allowed):

nmap -sV localhost -p 9001
Output
Starting Nmap 7.80 ( https://nmap.org ) at 2024-06-02 19:53 KST
Nmap scan report for localhost (127.0.0.1)
Host is up (0.00063s latency).
Other addresses for localhost (not scanned): ::1

PORT     STATE  SERVICE    VERSION
9001/tcp closed tor-orport

Service detection performed. Please report any incorrect results at https://nmap.org/submit/ .
Nmap done: 1 IP address (1 host up) scanned in 4.19 seconds

UFW (Step 3)

3
Open port in firewall [Back to Steps]

For insights on UFW, have a look at the following sources:

  • DigitalOcean Tutorial – UFW Essentials: Common Firewall Rules and Commands:

    '’UFW (uncomplicated firewall) is a firewall configuration tool that runs on top of iptables, included by default within Ubuntu distributions. It provides a streamlined interface for configuring common firewall use cases via the command line.’’

  • Ubuntu Help – UFW:

    '’The default firewall configuration tool for Ubuntu is ufw. Developed to ease iptables firewall configuration, ufw provides a user friendly way to create an IPv4 or IPv6 host-based firewall. By default UFW is disabled.’’

You can either choose to allow, deny, etc:

  • by port/[optional:protocol]:
    sudo ufw allow 80
    sudo ufw allow 80/tcp
    
  • by service/application name:
    sudo ufw http
    

On the Proxy server Pi:

sudo ufw allow 80/tcp

If you need to delete a rule, for instance, the one we just used:

sudo ufw delete allow 80/tcp

Note that ‘nginx’ only uses TCP regarding ports 80 and 443:

sudo lsof -Pn -i4:80,443 -a -c nginx
lsof: WARNING: can't stat() fuse.gvfsd-fuse file system /run/user/1000/gvfs
      Output information may be incomplete.
COMMAND  PID     USER   FD   TYPE   DEVICE SIZE/OFF NODE NAME
nginx    656     root    6u  IPv4    12139      0t0  TCP *:80 (LISTEN)
nginx    656     root   18u  IPv4    22440      0t0  TCP *:443 (LISTEN)
nginx   2582 www-data    5u  IPv4 15101132      0t0  TCP 192.168.219.102:443->143.248.47.117:37086 (ESTABLISHED)
nginx   2582 www-data    6u  IPv4    12139      0t0  TCP *:80 (LISTEN)
nginx   2582 www-data    9u  IPv4 15099142      0t0  TCP 192.168.219.102:443->143.248.47.117:33100 (ESTABLISHED)
nginx   2582 www-data   14u  IPv4 15100312      0t0  TCP 192.168.219.102:443->143.248.47.117:37496 (ESTABLISHED)
nginx   2582 www-data   15u  IPv4 15100436      0t0  TCP 192.168.219.102:443->143.248.47.117:46148 (ESTABLISHED)
nginx   2582 www-data   18u  IPv4    22440      0t0  TCP *:443 (LISTEN)
nginx   2583 www-data    6u  IPv4    12139      0t0  TCP *:80 (LISTEN)
nginx   2583 www-data   18u  IPv4    22440      0t0  TCP *:443 (LISTEN)
nginx   2584 www-data    6u  IPv4    12139      0t0  TCP *:80 (LISTEN)
nginx   2584 www-data   18u  IPv4    22440      0t0  TCP *:443 (LISTEN)
nginx   2585 www-data    6u  IPv4    12139      0t0  TCP *:80 (LISTEN)
nginx   2585 www-data   18u  IPv4    22440      0t0  TCP *:443 (LISTEN)

-a: ‘‘This option causes list selection options to be ANDed, as described above.’’

Indeed, without the -a option above, lsof will filter for -i4:80,443 OR -c nginx, thus including any results that fit one and/or the other. To only include results that fit both conditions at once, we need to ‘AND’ the options. For more details, see the man reference in the first lsof note.

Because we are reverse forwarding the relevant ports, there is no need to allow ports on the Workstation.

For test such as:

curl http://localhost:8080

They still work as they are behind the UFW firewall.

Similarly, because the ports 8080, 8081, and 8008 are only used internally by Nginx or directly used for the forwarding, but are not requested externally, they need not be allowed in the ufw firewall on the Proxy Pi.

Test

sudo ufw status
Status: active

To                         Action      From
--                         ------      ----
22                         ALLOW       Anywhere
80/tcp                     ALLOW       Anywhere
22 (v6)                    ALLOW       Anywhere (v6)
80/tcp (v6)                ALLOW       Anywhere (v6)      

Before sudo ufw allow 80/tcp on Pi:

$ nc -z -v app_clearml.blissfox.xyz 80
nc: connect to app_clearml.blissfox.xyz (182.226.43.201) port 80 (tcp) failed: Connection timed out

After sudo ufw allow 80/tcp on Pi:

$ nc -z -v app_clearml.blissfox.xyz 80
Connection to app_clearml.blissfox.xyz (182.226.43.201) 80 port [tcp/http] succeeded!

For insights on Netcat, have a look at the following sources:

  • nc (netcat) - La boite à outils réseau:

    ’‘nc (for ‘netcat’) is a CLI tool enabling you to read and write data over a network.’’

    Here is the translation (not more important than the other sources, just putting the content here for its English version)

    nc (for ‘netcat’) is a CLI tool enabling you to read and write data over a network.

    TOC

    TCP/UDP port test [TOC]

    To test the connexion status, use the -z option. This option also provides the port status.

    To test a TCP port, use:

    nc -z -v serveur port
    

    As an example on address 192.168.21.251 port 80 (HTTP):

    nc -z -v 192.168.21.251 80
    

    When the port is open, the output should be of this type:

    Connection to 192.168.21.251 80 port [tcp/http] succeeded!
    

    Otherwise, an example of failure (here, no SSH on port 22) would look like:

    nc: connect to 192.168.21.251 port 22 (tcp) failed: Connection refused
    

    To test a UDP port, use:

    nc -z -v -u serveur port
    

    Simplify add the -u option. As an example on address 192.168.21.251 port 68 UDP (DHCP):

    nc -z -v -u 192.168.21.251 68
    

    When the port is open, the output should be of this type:

    Connection to 192.168.21.251 68 port [udp/bootpc] succeeded!
    

    The output state can be tested with $? in bash. A 0 value indicates a cmd success, hence an open port. Any other value indicates an error.

    Exchange files [TOC]

    As hinted by its name, netcat can do the same as cat (display a file content) but over a network.

    For instance, say you want to transfer a file adrien.txt from one machine to another. Let’s use port 1234 (if you have a firewall enabled, you might have to open/allow the 1324/TCP port).

    On the recipient machine, launch nc with the -l option to listen, and specify the port with the -p option:

    nc -l -p 1234 > received_file.txt
    

    On the sending machine, feed the file to transfer. Use the -w option to define a timeout just in case (in seconds). Specify both the recipient address (192.168.21.251) and port (1234):

    nc -w 2 192.168.21.251 1234 < adrien.txt
    

    The cmd end is instantaneous. On the recipient machine, the file has arrived, and the nc -l cmd ends.

    Communicate between 2 machines [TOC]

    Communication between 2 machines is also possible. Indeed, the text inputted to the nc cmd is sent to the other machine which is in listen mode.

    On the first machine, launch nc in listen mode on a port (e.g. 1324):

    nc -l -p 1234
    

    On the other machine, connect to the machine which listens:

    nc -w 2 192.168.21.251 1234
    

    Text can then be sent. Press Enter to confirm the sending. Use Ctrl+C to quit nc.

  • How to Use Netcat Commands: Examples and Cheat Sheets
  • Netcat uses

nc -l 80
nc -z -v app_clearml.blissfox.xyz 80
  • -v: verbose[1]
  • -z: ‘‘Specifies that nc should just scan for listening daemons, without sending any data to them. It is an error to use this option in conjunction with the -l option.’‘[1]

See [1] nc(1) - Linux man page for reference.

Using -l would be counterproductive, indeed, to use a port with nc -l, this port should be available, that is not used:

blissfox-pi@blissfoxpi:~ $ nc -l 80
nc: Permission denied
blissfox-pi@blissfoxpi:~ $ sudo nc -l 80
nc: Address already in use
  • -l: ‘‘Used to specify that nc should listen for an incoming connection rather than initiate a connection to a remote host. It is an error to use this option in conjunction with the -p, -s, or -z options. Additionally, any timeouts specified with the -w option are ignored.’‘[1]

See [1] nc(1) - Linux man page for reference.

curl http://app_clearml.blissfox.xyz
netstat -nputw
netstat -cnputw
watch -n 1 netstat -nputw

'’The network statistics (netstat) command is a networking tool used for troubleshooting and configuration, that can also serve as a monitoring tool for connections over the network. Both incoming and outgoing connections, routing tables, port listening, and usage statistics are common uses for this command.’‘[1]

'’While in recent years netstat has been deprecated in favor of the ss command, you may still find it in your networking toolbox.’‘[1]

  • --numeric, -n: ‘‘Show numerical addresses instead of trying to determine symbolic host, port or user names.’‘[2]
  • -c, --continuous: ‘‘This will cause netstat to print the selected information every second continuously.’‘[2]
  • -p, --program: ‘‘Show the PID and name of the program to which each socket belongs.’‘[2]
  • --tcp -t[2]
  • --udp -u[2]
  • --raw -w[2]

Note: Though, netstat have the -c option, it actually prints the command results one after the other instead of ‘refreshing’ (clearing and re-displaying). As a result, I would actually favour:

watch -n 1 netstat -nputw

instead of:

netstat -cnputw

See [1] RedHat – Linux networking: 13 uses for netstat and [2] netstat(8) - Linux man page for references.

Router (Step 4)

4
Direct the port flow to the Reverse Proxy server [Back to Steps]

Configure NAT on the router to redirect port 80 & 443 on the right target:
Port forwarding settings

ON/OFF Service port Protocol IP Address Internal port
ON OFF 80~80 TCP/IP 192.168.219.102 80
ON OFF 443~443 TCP/IP 192.168.219.102 443

Because it need not receive external requests, there is also no need to port forward requests to the router on ports 8080, 8081, and 8008 to the same ports on the Proxy Pi.

OVH (Step 5)

5
Direct URLs to the Proxy server [Back to Steps]

Set OVH blissfox.xyz to redirect all the required URL IPs:

Domain Service
app_clearml.blissfox.xyz app/webserver
api_clearml.blissfox.xyz api
files_clearml.blissfox.xyz files

to the IP address ofproxy.blissfox.xyz:
OVH > Web Cloud > Domain names > [your_domain_name] (e.g. blissfox.xyz) > DNS zone> Add an entry and fill up accordingly:

Domain TTL Type Target
app_clearml.blissfox.xyz 0 CNAME proxy.blissfox.xyz
api_clearml.blissfox.xyz 0 CNAME proxy.blissfox.xyz
files_clearml.blissfox.xyz 0 CNAME proxy.blissfox.xyz

proxy.blissfox.xyz is defined as a dynhost for the Router IP of the Proxy Pi (ddclient on Proxy Pi). To check out how it was set up, you can refer to Reverse-tunneling to bypass a firewall with no fixed IP adress.

HTTPS (Step 6)

6
HTTPS [Back to Steps]

Using Let’s Encrypt (Let’s Encrypt– Getting Started), we use the recommended ACME client Certbot.

Following the Certbot Instructions – My HTTP website is running Nginx on Ubuntu, with two additions from other sources (installing snapd on the pi and details about prompts when using certbot), as well as the results I had with the certbot cmd, and a final additional step and note (identified by [RR] when from my own):

On Pi:

  1. Install snapd

    From snapcraft’s site to install snapd, we get and follow: Canonical Snapcraft – Installing snap on Raspberry Pi OS:

    1. Install snapd:

      $ sudo apt update
      $ sudo apt install snapd
      
    2. Reboot the device (required):

      $ sudo reboot
      
    3. Install the core snap in order to get the latest snapd:

      $ sudo snap install core
      core 16-2.45.2 from Canonical✓ installed
      

      some snaps require new snapd features and will show an error such as snap "lxd" assumes unsupported features" during install. You can solve this issue by making sure the core snap is installed (snap install core) and it’s the latest version (snap refresh core).

    4. To test your system, install the hello-world snap and make sure it runs correctly:

      $ snap install hello-world
      hello-world 6.3 from Canonical✓ installed
      $ hello-world
      Hello World!
      

      Snap is now installed and ready to go!

    Ubuntu Core on the Raspberry Pi:\ Snap is an integral part of Ubuntu Core, which can be installed as the native Raspberry Pi operating system. Ubuntu Core provides more permissive access to the Raspberry Pi, and may enable functionality not easily mirrored when snap is installed from Raspberry Pi OS. A good example of this is low-level access to a Raspberry Pi’s GPIO pins.

  2. Remove certbot-auto and any Certbot OS packages

    If you have any Certbot packages installed using an OS package manager like apt, dnf, or yum, you should remove them before installing the Certbot snap to ensure that when you run the command certbot the snap is used rather than the installation from your OS package manager. The exact command to do this depends on your OS, but common examples are sudo apt-get remove certbot, sudo dnf remove certbot, or sudo yum remove certbot.

  3. Install Certbot

    Run this command on the command line on the machine to install Certbot.

    sudo snap install --classic certbot
    
  4. Prepare the Certbot command

    Execute the following instruction on the command line on the machine to ensure that the certbot command can be run.

    sudo ln -s /snap/bin/certbot /usr/bin/certbot
    
  5. Choose how you’d like to run Certbot

    Either get and install your certificates…

    Run this command to get a certificate and have Certbot edit your nginx configuration automatically to serve it, turning on HTTPS access in a single step.

    sudo certbot --nginx
    

    Or, just get a certificate

    If you’re feeling more conservative and would like to make the changes to your nginx configuration by hand, run this command.

    sudo certbot certonly --nginx
    
    From Use Certbot to Enable HTTPS with NGINX on Ubuntu – Requesting a TLS/SSL Certificate Using Certbot

    ’’ During the certificate granting process, Certbot asks a series of questions about the domain so it can properly request the certificate. You must agree to the terms of service and provide a valid administrative email address. Depending upon the server configuration, the messages displayed by Certbot might differ somewhat from what is shown here.

    1. Run Certbot to start the certificate request. When Certbot runs, it requests and installs certificate file along with a private key file. When used with the NGINX plugin (--nginx), Certbot also automatically edits the configuration files for NGINX, which dramatically simplifies configuring HTTPS for your web server. If you prefer to manually adjust the configuration files, you can run Certbot using the certonly command.

      • Request a certficate and automatically configure it on NGINX (recommended):
        sudo certbot --nginx
        
      • Request a certificate without configuring NGINX:
        sudo certbot certonly --nginx
        

        To request the certificate without relying on your NGINX installation, you can instead use the standalone plugin (--standalone).

      During the installation process, Certbot will prompt you for some basic information including your email address and domain name.

    2. Enter email address. The first prompt is to request an email address where Certbot can send urgent notices about the domain or registration. This should be the address of the web server administrator.

    3. Accept terms of service. Certbot next asks you to agree to the Let’s Encrypt terms of service. Use the link in the output to download the PDF file and review the document. If you agree with the terms, enter Y. Entering N terminates the certificate request.

    4. Optionally subscribe to mailing list. Certbot asks if you want to subscribe to the EFF mailing list. You can answer either Y or N without affecting the rest of the installation.

    5. Enter domain name(s). Certbot now requests a domain name for the certificate. If there is a virtual host file for the domain, Certbot displays the names of the eligible domains. Select the numbers corresponding to the domains you are requesting certificates for, separated by spaces. If the domain doesn’t appear, you can enter the name for each domain without the http or https prefix. For each domain name, you should request separate certificates with and without the www prefix. If you have more than one domain to certify, separate the names with either a space or a comma.

        www.example.com example.com
      

      Certbot displays the names of domains configured in the server blocks configured withing NGINX. Select the numbers corresponding to the domains you are requesting certificates for, separated by spaces.

    6. Certbot then communicates with Let’s Encrypt to request the certificate(s) and perform any necessary challenges as defined in the ACME standard (see Challenge Types). In most cases, ownership can be proven through the HTTP challenge, which automatically adds a file on your web server. If you wish to change the challenge type or perform challenge manually, see the Manual section in the Certbot documentation.

    If the operation is successful, Certbot confirms the certificates are enabled. It also displays some information about the directories where the certificates and key chains are stored, along with the expiration date. Certificates typically expire in 90 days. ‘’

    [RR]

    The first option sudo certbot --nginx is recommended and actually worked flawlessly, it identified the already configured addresses, and modified correctly /etc/nginx/sites-enabled/clearml.conf to change from port 80 to port 443 with the newly generated certifcates.

    blissfox-pi@blissfoxpi:~ $ sudo certbot --nginx
    Saving debug log to /var/log/letsencrypt/letsencrypt.log
    Enter email address (used for urgent renewal and security notices)
      (Enter 'c' to cancel): renardromain@hotmail.fr
    
    - - - - - - - - - - - - - - - - - - - - - - - - - - - - - - - - - - - - - - - -
    Please read the Terms of Service at
    https://letsencrypt.org/documents/LE-SA-v1.4-April-3-2024.pdf. You must agree in
    order to register with the ACME server. Do you agree?
    - - - - - - - - - - - - - - - - - - - - - - - - - - - - - - - - - - - - - - - -
    (Y)es/(N)o: Y
    
    - - - - - - - - - - - - - - - - - - - - - - - - - - - - - - - - - - - - - - - -
    Would you be willing, once your first certificate is successfully issued, to
    share your email address with the Electronic Frontier Foundation, a founding
    partner of the Let's Encrypt project and the non-profit organization that
    develops Certbot? We'd like to send you email about our work encrypting the web,
    EFF news, campaigns, and ways to support digital freedom.
    - - - - - - - - - - - - - - - - - - - - - - - - - - - - - - - - - - - - - - - -
    (Y)es/(N)o: N
    Account registered.
    
    Which names would you like to activate HTTPS for?
    We recommend selecting either all domains, or all domains in a VirtualHost/server block.
    - - - - - - - - - - - - - - - - - - - - - - - - - - - - - - - - - - - - - - - -
    1: api_clearml.blissfox.xyz
    2: app_clearml.blissfox.xyz
    3: files_clearml.blissfox.xyz
    - - - - - - - - - - - - - - - - - - - - - - - - - - - - - - - - - - - - - - - -
    Select the appropriate numbers separated by commas and/or spaces, or leave input
    blank to select all options shown (Enter 'c' to cancel): 
    Requesting a certificate for api_clearml.blissfox.xyz and 2 more domains
    
    Successfully received certificate.
    Certificate is saved at: /etc/letsencrypt/live/api_clearml.blissfox.xyz/fullchain.pem
    Key is saved at:         /etc/letsencrypt/live/api_clearml.blissfox.xyz/privkey.pem
    This certificate expires on 2024-08-11.
    These files will be updated when the certificate renews.
    Certbot has set up a scheduled task to automatically renew this certificate in the background.
    
    Deploying certificate
    Successfully deployed certificate for api_clearml.blissfox.xyz to /etc/nginx/sites-enabled/clearml.conf
    Successfully deployed certificate for app_clearml.blissfox.xyz to /etc/nginx/sites-enabled/clearml.conf
    Successfully deployed certificate for files_clearml.blissfox.xyz to /etc/nginx/sites-enabled/clearml.conf
    Congratulations! You have successfully enabled HTTPS on https://api_clearml.blissfox.xyz, https://app_clearml.blissfox.xyz, and https://files_clearml.blissfox.xyz
    
    - - - - - - - - - - - - - - - - - - - - - - - - - - - - - - - - - - - - - - - -
    If you like Certbot, please consider supporting our work by:
      * Donating to ISRG / Let's Encrypt:   https://letsencrypt.org/donate
      * Donating to EFF:                    https://eff.org/donate-le
    - - - - - - - - - - - - - - - - - - - - - - - - - - - - - - - - - - - - - - - -
    

    Your file /etc/nginx/sites-available/clearml.conf should now looks like:

    server_names_hash_bucket_size  64;
    server {
    	server_name app_clearml.blissfox.xyz;
    
        	location / {
            	proxy_pass http://localhost:8080;
        	}
    
        listen [::]:443 ssl; # managed by Certbot
        listen 443 ssl; # managed by Certbot
        ssl_certificate /etc/letsencrypt/live/api_clearml.blissfox.xyz/fullchain.pem; # managed by Certbot
        ssl_certificate_key /etc/letsencrypt/live/api_clearml.blissfox.xyz/privkey.pem; # managed by Certbot
        include /etc/letsencrypt/options-ssl-nginx.conf; # managed by Certbot
        ssl_dhparam /etc/letsencrypt/ssl-dhparams.pem; # managed by Certbot
    
    }
    
    server {
        	server_name api_clearml.blissfox.xyz;
    
        	location / {
            	proxy_pass http://localhost:8008;
        	}   
    
        listen [::]:443 ssl ipv6only=on; # managed by Certbot
        listen 443 ssl; # managed by Certbot
        ssl_certificate /etc/letsencrypt/live/api_clearml.blissfox.xyz/fullchain.pem; # managed by Certbot
        ssl_certificate_key /etc/letsencrypt/live/api_clearml.blissfox.xyz/privkey.pem; # managed by Certbot
        include /etc/letsencrypt/options-ssl-nginx.conf; # managed by Certbot
        ssl_dhparam /etc/letsencrypt/ssl-dhparams.pem; # managed by Certbot
    
    }
    
    server {
        	server_name files_clearml.blissfox.xyz;
    
        	location / {
            	proxy_pass http://localhost:8081;
      	}   
    
        listen [::]:443 ssl; # managed by Certbot
        listen 443 ssl; # managed by Certbot
        ssl_certificate /etc/letsencrypt/live/api_clearml.blissfox.xyz/fullchain.pem; # managed by Certbot
        ssl_certificate_key /etc/letsencrypt/live/api_clearml.blissfox.xyz/privkey.pem; # managed by Certbot
        include /etc/letsencrypt/options-ssl-nginx.conf; # managed by Certbot
        ssl_dhparam /etc/letsencrypt/ssl-dhparams.pem; # managed by Certbot
    
    }


    server {
        if ($host = api_clearml.blissfox.xyz) {
            return 301 https://$host$request_uri;
        } # managed by Certbot
    
    
        	listen 80;
    	listen [::]:80;
        	server_name api_clearml.blissfox.xyz;
        return 404; # managed by Certbot
    
    
    }
    server {
        if ($host = app_clearml.blissfox.xyz) {
            return 301 https://$host$request_uri;
        } # managed by Certbot
    
    
        	listen 80;
    	listen [::]:80;
    	server_name app_clearml.blissfox.xyz;
        return 404; # managed by Certbot
    
    
    }
    
    server {
        if ($host = files_clearml.blissfox.xyz) {
            return 301 https://$host$request_uri;
        } # managed by Certbot
    
    
        	listen 80;
    	listen [::]:80;
        	server_name files_clearml.blissfox.xyz;
        return 404; # managed by Certbot
    
    
    }
  6. Test automatic renewal

    The Certbot packages on your system come with a cron job or systemd timer that will renew your certificates automatically before they expire. You will not need to run Certbot again, unless you change your configuration. You can test automatic renewal for your certificates by running this command:

    sudo certbot renew --dry-run
    

    The command to renew certbot is installed in one of the following locations:

    • /etc/crontab/
    • /etc/cron.*/*
    • systemctl list-timers
  7. Confirm that Certbot worked

    To confirm that your site is set up properly, visit https://yourwebsite.com/ in your browser and look for the lock icon in the URL bar.

  8. [RR] Do not forget to allow HTTPS through UFW

    Do not forget to:

    sudo ufw https
    

[RR]

Do not forget to modify clearml.conf>api accordingly, that is changing http to https.

Forgetting to do so will result in errors such as:

Error: Action failed <400/12: tasks.create/v1.0 (Validation error (error for field 'name'. field is required!))

When attempting to create/init a clearml-task.

Test

Check out your firewall on Proxy Pi:

sudo ufw status
Status: active

To                         Action      From
--                         ------      ----
22                         ALLOW       Anywhere
80/tcp                     ALLOW       Anywhere
443                        ALLOW       Anywhere
22 (v6)                    ALLOW       Anywhere (v6)
80/tcp (v6)                ALLOW       Anywhere (v6)
443 (v6)                   ALLOW       Anywhere (v6)

Check out that https is working:

  • With curl:
    • curling the http address:
      curl http://app_clearml.blissfox.xyz
      <html>
      <head><title>301 Moved Permanently</title></head>
      <body>
      <center><h1>301 Moved Permanently</h1></center>
      <hr><center>nginx/1.18.0</center>
      </body>
      </html>
      

      will lead you to a standard ‘error’ message.

    • Actually, there is a redirection to the https address. To follow the redirection using curl, you can use:
      curl --location http://app_clearml.blissfox.xyz
      
    • Or you can directly curl the https address:
      curl https://app_clearml.blissfox.xyz
      
    • These last two should lead you to the same page starting with:
      <html lang="en" data-critters-container>
      <head>
        <meta charset="utf-8">
        <title>ClearML</title>
        <base href="/">
      
  • In your browser: you can just check out that:
    • you are indeed redirected to https://app_clearml.blissfox.xyz when entering app_clearml.blissfox.xyz
    • you have the lock symbol () to the left of your URL once you have landed on the page (Verified by: Let's Encrypt when hovering on it)

Web Login Authentication using hashed passwords (Step 7)

7
Web Login Authentication using hashed passwords [Back to Steps]

Coming back on the Web Login Authentication (See Step0 – Secure ClearML-server [preliminary] if you have not set it up yet).

Directly following ClearML Docs – Web Login Authentication in the doc:

From ClearML Docs – Using Hashed Passwords

’’

You can also use hashed passwords instead of plain-text passwords. To do that:

  • Set pass_hashed: true
  • Use a base64-encoded hashed password in the password field instead of a plain-text password. Assuming Jane’s plain-text password is 123456, use the following bash command to generate the base64-encoded hashed password:
    > python3 -c 'import bcrypt,base64; print(base64.b64encode(bcrypt.hashpw("123456".encode(), bcrypt.gensalt())))'
    b'JDJiJDEyJDk3OHBFcHFlNEsxTkFoZDlPcGZsbC5sU1pmM3huZ1RpeHc0ay5WUjlzTzN5WE1WRXJrUmhp'
    
  • Use the command’s output as the user’s password. Resulting apiserver.conf file should look as follows:
    auth {
      # Fixed users login credentials
      # No other user will be able to login
      fixed_users {
          enabled: true
          pass_hashed: true
          users: [
              {
                  username: "jane"
                  password: "JDJiJDEyJDk3OHBFcHFlNEsxTkFoZDlPcGZsbC5sU1pmM3huZ1RpeHc0ay5WUjlzTzN5WE1WRXJrUmhp"
                  name: "Jane Doe"
              }
          ]
      }
    }
    

If the apiserver.conf file does not exist, create your own in ClearML Server’s /opt/clearml/config directory (or an alternate folder you configured), and input the modified configuration

’’

Note that bcrypt is not a python standard package, and thus have to be installed:

  • Pypi bcrypt: ‘‘Acceptable password hashing for your software and your servers (but you should really use argon2id or scrypt)’’

    '’While bcrypt remains an acceptable choice for password storage, depending on your specific use case you may also want to consider using scrypt (either via standard library or cryptography) or argon2id via argon2_cffi.’’

    Dependencies:

    sudo apt-get install build-essential cargo
    

    It seems that installing cargo is actually not required for the code snippet to work (tested in a ubuntu:jammy docker container with apt update and then install of python3.10 and python3-pip, and pip install bcrypt)\ Cargo (e.g. jammy pkg): Rust package manager

    Install bcrypt:

    pip install bcrypt
    
  • GH bcrypt

Server Credentials and Secrets (Step 8)

8
Server Credentials and Secrets [Back to Steps]
From ClearML Docs – Server Credentials and Secrets

’’ By default, ClearML Server comes with default values that are designed to allow to set it up quickly and to start working with the ClearML SDK.

However, this also means that the server must be secured by either preventing any external access, or by changing defaults so that the server’s credentials are not publicly known.

The ClearML Server default secrets can be found here, and can be changed using the secure.conf configuration file or using environment variables (see ClearML Server Feature Configurations).

Specifically, the relevant settings are:

  • secure.http.session_secret.apiserver
  • secure.auth.token_secret
  • secure.credentials.apiserver.user_key
  • secure.credentials.apiserver.user_secret
  • secure.credentials.webserver.user_key (automatically revoked by the server if using Web Login Authentication)
  • secure.credentials.webserver.user_secret (automatically revoked by the server if using Web Login Authentication)
  • secure.credentials.tests.user_key
  • secure.credentials.tests.user_secret

Securing the ClearML Server means also using Web Login Authentication, since the default “free access” login is inherently unsecure (and will not work once secure.credentials.webserver.user_key and secure.credentials.webserver.user_secret values are changed)

Example: Using Environment Variables

To set new values for these settings, use the following environment variables:

  • CLEARML__SECURE__HTTP__SESSION_SECRET__APISERVER="new-secret-string"
  • CLEARML__SECURE__AUTH__TOKEN_SECRET="new-secret-string"
  • CLEARML__SECURE__CREDENTIALS__APISERVER__USER_KEY="new-key-string"
  • CLEARML__SECURE__CREDENTIALS__APISERVER__USER_SECRET="new-secret-string"
  • CLEARML__SECURE__CREDENTIALS__WEBSERVER__USER_KEY="new-key-string"
  • CLEARML__SECURE__CREDENTIALS__WEBSERVER__USER_SECRET="new-secret-string"
  • CLEARML__SECURE__CREDENTIALS__TESTS__USER_KEY="new-key-string"
  • CLEARML__SECURE__CREDENTIALS__TESTS__USER_SECRET="new-secret-string"

Example: Using Docker Compose

If used in docker-compose.yml, these variables should be specified for the apiserver service, under the environment section as follows:

version: "3.6"
services:
  apiserver:
    ...
    environment:
      ...
      CLEARML__SECURE__HTTP__SESSION_SECRET__APISERVER: "new-secret-string"
      CLEARML__SECURE__AUTH__TOKEN_SECRET: "new-secret-string"
      CLEARML__SECURE__CREDENTIALS__APISERVER__USER_KEY: "new-key-string"
      CLEARML__SECURE__CREDENTIALS__APISERVER__USER_SECRET: "new-secret-string"
      CLEARML__SECURE__CREDENTIALS__WEBSERVER__USER_KEY: "new-key-string"
      CLEARML__SECURE__CREDENTIALS__WEBSERVER__USER_SECRET: "new-secret-string"
      CLEARML__SECURE__CREDENTIALS__TESTS__USER_KEY: "new-key-string"
      CLEARML__SECURE__CREDENTIALS__TESTS__USER_SECRET: "new-secret-string"
  ...

When generating new user keys and secrets, make sure to use sufficiently long strings (we use 30 chars for keys and 50-60 chars for secrets). See here for Python example code to generate these strings.

’’

From GH allegroai/clearml-server/apiserver/config/default/secure.conf
{
    http {
        session_secret {
            apiserver: "Gx*gB-L2U8!Naqzd#8=7A4&+=In4H(da424H33ZTDQRGF6=FWw"
        }
    }

    auth {
        # token sign secret
        token_secret: "7E1ua3xP9GT2(cIQOfhjp+gwN6spBeCAmN-XuugYle00I=Wc+u"
    }

    credentials {
        # system credentials as they appear in the auth DB, used for intra-service communications
        apiserver {
            role: "system"
            user_key: "62T8CP7HGBC6647XF9314C2VY67RJO"
            user_secret: "FhS8VZv_I4%6Mo$8S1BWc$n$=o1dMYSivuiWU-Vguq7qGOKskG-d+b@tn_Iq"
        }
        webserver {
            role: "system"
            user_key: "EYVQ385RW7Y2QQUH88CZ7DWIQ1WUHP"
            user_secret: "yfc8KQo*GMXb*9p((qcYC7ByFIpF7I&4VH3BfUYXH%o9vX1ZUZQEEw1Inc)S"
            revoke_in_fixed_mode: true
        }
        services_agent {
            role: "admin"
            user_key: "P4BMJA7RK3TKBXGSY8OAA1FA8TOD11"
            user_secret: "9LsgSfa0SYz0zli1_c500ZcLqanre2xkWOpepyt1w-BKK3_DKPHrtoj3JSHvyy8bIi0"
        }
        tests {
            role: "user"
            display_name: "Default User"
            user_key: "EGRTCO8JMSIGI6S39GTP43NFWXDQOW"
            user_secret: "x!XTov_G-#vspE*Y(h$Anm&DIc5Ou-F)jsl$PdOyj5wG1&E!Z8"
            revoke_in_fixed_mode: true
        }
    }
}
From GH allegroai/clearml-server/apiserver/service_repo/auth/utils.py
import random
import string

sys_random = random.SystemRandom()


def get_random_string(
    length: int = 12, allowed_chars: str = string.ascii_letters + string.digits
) -> str:
    """
    Returns a securely generated random string.

    The default length of 12 with the a-z, A-Z, 0-9 character set returns
    a 71-bit value. log_2((26+26+10)^12) =~ 71 bits.

    Taken from the django.utils.crypto module.
    """
    return "".join(sys_random.choice(allowed_chars) for _ in range(length))


def get_client_id(length: int = 20) -> str:
    """
    Create a random secret key.

    Taken from the Django project.
    """
    chars = string.ascii_uppercase + string.digits
    return get_random_string(length, chars)


def get_secret_key(length: int = 50) -> str:
    """
    Create a random secret key.

    Taken from the Django project.
    NOTE: asterisk is not supported due to issues with environment variables containing
     asterisks (in case the secret key is stored in an environment variable)
    """
    chars = string.ascii_letters + string.digits
    return get_random_string(length, chars)

4 keys 6 secrets to generate:

for _ in range(4):
  print(get_client_id(30))
for _ in range(6):
  print(get_secret_key(60))
From ClearML – ClearML Server Feature Configurations: Configuration Files

’’ The ClearML Server uses the following configuration files:

  • apiserver.conf
  • hosts.conf
  • logging.conf
  • secure.conf
  • services.conf

When starting up, the ClearML Server will look for these configuration files, in the /opt/clearml/config directory (this path can be modified using the CLEARML_CONFIG_DIR environment variable). The default configuration files are in the clearml-server repository.

If you want to modify server configuration, and the relevant configuration file doesn’t exist, you can create the file, and input the relevant modified configuration.

Within the default structure, the services.conf file is represented by a subdirectory with service-specific .conf files. If services.conf is used to configure the server, any setting related to a file under the services subdirectory can simply be represented by a key within the services.conf file. For example, to override multi_task_histogram_limit that appears in the default/services/tasks.conf, the services.conf file should contain:

tasks {
   "multi_task_histogram_limit": <new-value>
}

’’

Securing ClearML Server – File Server Security (Step 9)

9
Securing ClearML Server -- File Server Security [Back to Steps]

ClearML Docs – Securing ClearML Server

Among the recommended endaviours:

Network Security
User Access Security
File Server Security
Server Credentials and Secrets

We only skipped the File Server Security recommendation:

'’By default, the File Server is not secured even if Web Login Authentication has been configured. Using an object storage solution that has built-in security is recommended.’’

We will however have a small look at the options:

From ClearML Docs – Storage

’’

ClearML is able to interface with the most popular storage solutions in the market for storing model checkpoints, artifacts and charts.

Supported storage mediums include:

To use cloud storage with ClearML, install the clearml package for your cloud storage type, and then configure your storage credentials.

Once uploading an object to a storage medium, each machine that uses the object must have access to it.

’’

Among the supported storage mediums, Amazon S3, Google Cloud Storage, and Azure Storage (Microsoft) are well-known proprietary cloud-based storage solutions.

Let’s have a look at the two left:

  • Ceph

    From Wikipedia – Ceph (software) (last visited May 16, 2024)

    ’’

    Original author(s) Inktank Storage (Sage Weil, Yehuda Sadeh Weinraub, Gregory Farnum, Josh Durgin, Samuel Just, Wido den Hollander)
    Developer(s) Red Hat, Intel, CERN, Cisco, Fujitsu, SanDisk, Canonical and SUSE
    Stable release 18.2.0(Reef) / 3 August 2023
    Repository github.com/ceph/ceph
    Written in C++, Python
    Operating system Linux, FreeBSD, Windows
    Type Distributed object store
    License LGPLv2.1
    Website ceph.io

    Ceph (pronounced /ˈsɛf/) is a free and open-source software-defined storage platform that provides object storage, block storage, and file storage built on a common distributed cluster foundation. Ceph provides completely distributed operation without a single point of failure and scalability to the exabyte level, and is freely available. Since version 12 (Luminous), Ceph does not rely on any other conventional filesystem and directly manages HDDs and SSDs with its own storage backend BlueStore and can expose a POSIX filesystem.

    Ceph replicates data with fault tolerance, using commodity hardware and Ethernet IP and requiring no specific hardware support. Ceph is highly available and ensures strong data durability through techniques including replication, erasure coding, snapshots and clones. By design, the system is both self-healing and self-managing, minimizing administration time and other costs.

    Large-scale production Ceph deployments include CERN, OVH and DigitalOcean.

    ’’

  • MinIO

    From Wikipedia – MinIO(last visited May 16, 2024)

    ’’

    Developer(s) MinIO, Inc
    Initial release 11 March 2016; 8 years ago
    Stable release 2024-02-14T21-36-02Z/ 14 February 2024; 2 months ago
    Repository github.com/minio/minio
    Written in Go
    Type Object storage
    License GNU Affero GPL
    Website min.io

    MinIO is a High-Performance Object Storage system released under GNU Affero General Public License v3.0. It is API compatible with the Amazon S3 cloud storage service. It is capable of working with unstructured data such as photos, videos, log files, backups, and container images with the maximum supported object size being 50TB.

    History & development

    MinIO’s main developer is MinIO Inc, a Silicon Valley–based technology startup founded by Anand Babu Periasamy, Garima Kapoor, and Harshavardhana in November 2014.

    ’’


Please do not hesitate to leave a comment below or dm me if you have any feedback, whether it is about a mistake I made in the articles or suggestions for improvements.


    Other articles:

  • Reverse-tunneling to bypass a firewall with no fixed IP adress
  • Docker, Docker Compose & Nvidia GPUs
  • dummy